Winter Wishes

I made this card for my crafting friend Marilyn (Crafts & Beyond blog). We had lunch, exchanged our Christmas gifts & cards,  had a good hour and a half gab session ending with a warm brownie & chocolate sauce dessert, and a bit of shopping.  Living a couple of hours from each other, it's always good to get together! Marilyn, we are definitely long overdue for a crafting technique weekend.

click to enlarge


The base was made by spreading Ranger Texture Paste over the whole surface of a 4x6" stencil by Memory Box -"Snowflake Lace", and sprinkling some Stampendous Frantage Chunky Enamel White embossing powder over the wet paste. Once the paste was dried, I lightly heated the EP.  You  have to be careful aiming the heat gun - if heat stays too long on one spot, the paste will bubble. Actually, if I were to do this technique again, I wouldn't use as much EP as I lost a lot of the snowflake pattern. The effect reminds me of tiny hail balls.

The large snowflake is a wooden stamp I've had for at least 10 years. It's always good to give favourite stamps some love every now and then LOL!  I stamped with Versamark and embossed with Wow Metal Rhodium Sparkle powder. This stuff has so much shine...wish I could have captured it in the photo! Also added Star Dust Stickles glitter.  I put some frayed silver, wide mesh ribbon fibres, and loops of silver cording underneath the snowflake. The flower (from Micheal's) has Stickles Silver, Platinum and Star Dust glitter and a sparkly centre jewel embellishment.

The little tag is a Spellbinders die, and words cut from glitzy silver Stampin'Up! paper are Tim Holtz Holiday Word Script dies.  The blue jingle bells music paper was spritzed all over with TH Picket Fence Distress Spray.

We are going to a Christmas party tomorrow night, and Pancake & Sausage Breakfast with Santa on Saturday morning with our daughter , her husband and  3 year old grandson. This is an annual fund-raiser for the local Help Line. Then the high school band Christmas Concert is on Sunday afternoon. Our daughter was in the band, Honour Choir and Jazz Choir all through middle school & high school. Of course, it was a "given" that we attend the concerts. We no longer know any of the kids, but we always appreciate and enjoy listening to holiday music they have spent many hours practicing.  'Tis the Season!  (busy, busy busy.....)

Thanks for popping in to read my blog, and have a great weekend.


Sharon
Dec. 3, 2015

Frilly & Funkie: 'Tis the Season

Papertake Weekly - Anything Goes

ABC Challenge  - W is for Wishes

Simon Says Wednesday Challenge: Let it Snow

Santa Claus is Coming to Town - Ornamental Christmas Frame

Over at Anything But Cute, the challenge for the past month is "It's Ornamental", deadline Dec.5th.

I created this project for my daughter which I called "Santa Claus is Coming to Town". The picture of my grandson Connor with a cookie for Santa, taken last year on Christmas Eve,  is pretty cute so I hope this doesn't disqualify my entry LOL!

click to enlarge


I started off with a  6"x12" frame from the Dollar Store which had a saying on it in black paint on burlap. I bought it thinking this is a good size for something creative - not too large. So many times I bring things home to re-purpose them and they end up sitting in my craft cupboard.  This one was only two days in the house and I had an idea!!!! I took out the saying that was inside the frame replacing it with new burlap.

Over the burlap I patted Ranger Texture Paste through the Festive stencil by Tim Holtz. When the paste was dry, I replaced the stencil over the paste and sponged on distress inks - Fired Brick, Forest Moss, Brushed Corduroy and Tea Dye. I also applied a thick layer of Picket Fence distress paint and distress glitter around all the edges to look like snow. Here's what it looked like before I started adding all the elements.
click to enlarge


I re- sized the photo of Connor, glued it to cereal box cardboard, rounded the corners with a punch,and placed self-adhesive acrylic over the image to protect it, topped with a wood star and cording.  There is a bit of glare on the right side from the camera because of the acrylic coating - hard to photograph.

The Santa face is a vintage cardstock sticker from Heartwarming Vintage Creative Scraps.I sponged around the edge with Tea Dye to further age. The other sayings (Santa Claus is coming to Town, and Believe) along with the pinecone 3-d stickers are from my christmas stash. I used a small tag die to cut the "24" tag, then stamped the numbers, sponged the edges and added red glitter, mounted on a TH pin. I created the pinecone using the Tim Holtz die, added some "snow" with paint and glitter. It is glued under a green crushed ribbon bow, along with some glittered leaves also from my stash.   I also added some bits of Stickles glitter here and there (Santa hat, berries, leaves, etc.)

After doing this frame and the tag below in a previous post, I think I have finally mastered the Tim Holtz pinecone die. I've only had it two years and was about to sell it (from frustration!) when I gave it one more try. I still feel like I'm all "fingers" while putting it together, but at least the finished item now looks like a pinecone instead of something squished!!!  Also I'm going to give the TH Festive stencil a break for this year or you all will be tired of seeing it.  LOL!

It was fun doing this and it didn't take all that long, except for one afternoon to do the stenciling paste. I hope my daughter likes it!

Thanks for stopping by to take a peek at my projects!

Sharon
Dec. 1, 2015


Made my Day!

I just found out that my santa and sleigh scene card made Top 5 in Try It On Tuesday Challenge, and I get a badge to put on my sidebar.

This was an extra nice surprise to end the day!  Thanks so much to the judges!

Sharon
Dec. 1/15


Merry and Bright Christmas Tag

I had a nice Sunday afternoon crafting yesterday. I put on some christmas music and finished a tag I started a few weeks ago.
click to enlarge


For the background, I sponged a bit of Forest Moss and Shabby Shutters distress ink randomly over the surface of a kraft tag.  I put  some Ranger Texture Paste into four wells of an art palette and coloured each with TH reinkers - Fired Brick, Brushed Corduroy, Tea Dye, and Pine Needles. Then I spread the paste over a TH "Festive" stencil. When the paste was dry, I spritzed all over with Tattered Angels Glimmer Mist Irridescent Gold.

I cut some greenery using TH Holiday Greens thinlit dies from bits of TH Kraft-Core  paper, sanding off the surface in some places and sponging with distress inks to age.

From a Brick Red Kraft-Core piece, I cut the verse Merry & Bright from TH Holiday Word Block thinlit dies, and used a scrap of kraft cardstock to place behind the cut-out words. I thought the letters "R" and B" looked funny without their defining loops , so I glued on the little bits that pop out. If you have these dies, you know what I mean...LOL!   Now they look more like regular letters.  I also spritzed the gold glimmer mist over and fastened it to the tag with tiny gold star brads.

I created a bow from olive crushed silk ribbon, placing loops of metallic cord behind, adding a red metal bell, a pinecone (TH die) and two little gold, styrofoam balls. I recently bought a decorative sprig from Michaels for half price, $1.50, made with these little gold and silver balls - I thought they would come in handy as they were tiny enough for card making.

A pinecone brad and ribbon at the top finishes the tag.

It snowed overnight covering the lawns and streets.  Our first blanketing snow of the season!

Thanks for stopping by and reading how I made this tag.

Sharon
Nov.30,2015


Create a Scene Christmas Cards

The past two afternoons I have been playing with creating winter scenes using sponged distress inks and also watercolours, following tutorials on Penny Black YouTube videos (Heather Telford; Micheline "Mimi" Jourdain; and Jill Foster).  Last winter, I played around a bit with distress inks for snow hills and moons, but creating skies with watercolours is a new one to me.  I did several before having one I was pleased with...LOL!  All three of the ladies say in their tutorials they don't use many embellishments on the completed card as the scene is the main focal point....I tend to agree.

Also new to me is using Windsor & Newton Art Masking Fluid. Love this stuff! You flick it on the paper with a toothbrush, before doing any inking or watercolour, and it dries rubbery resisting the medium. After you  have finished your scene, rub it off with your fingers revealing white areas of "snow".  It goes on beige so you can see how little or how many flecks you have.

(1)  This card uses the sponged distress inks, Faded Jeans and Chipped Sapphire, for the snow and sky. The moon is masked off with a 1-1/4" inch circle while sponging. I applied the art fluid for the "snow". The tree is an old favourite one by Stampin' Up! stamped several times with Forest Moss, Pine Needles, and Crushed Olive inks.  The Santa sleigh and reindeer is a die by Impression Obsession; the word "believe" is cut from mat silver cardstock using TH Holiday Word die. I also stuck on two little silver stars - one by the moon, and other for the dot on the "i" in believe.     I recently read a hint on someone's blog to use stars, pearls, or a drop of stickles for the "i" , as the dot is such a tiny piece.  It's very easy to lose it when you punch the word from the die.  Good hint!

Click to enlarge

(2)  For this card, I followed the tutorial by Jill Foster for Penny Black. She has quite a few cards using this watercolour sunset sky for all seasons of the year. I used Cotman Watercolours -yellow, orange, pink and mauve for the sky; also Payne's Grey, Burnt Umber and Phalo Blue for under the trees and snow hill. The trees were stamped with Archival inks- Library Green and Black, branches in Coffee.  Snow is TH Picket Fence distress spray.  I don't have any Penny Black stamps for making scenes so I used my SU tree stamp once again, and the "branches" in the middle of the card are the tips of an older cling stamp by Tim Holtz. Deer dies are by Impression Obsession to which I added a few white details on their tails, spots, and antlers. I also added the TH words "peace on earth" cut from gold cardstock and a gold star.


I did a few of these sunsets skies while I had everything out, so I have some on hand for future cards.

We had a sprinkling of snow this morning on the lawn - puts me in the seasonal mood!

Sharon
Nov.  19/2015

Challenge:

Try it on Tuesdays:  Create a Scene

Simon Says Wednesday Challenge - it's Christmas


Autumn and Halloween

I have been very lazy about my blog, and for a while I was going to stop posting completely. Having this discussion with stamping friends, I decided to keep it going, but maybe not as detailed as previous posts. Well, tonight I couldn't sleep so decided to surf Pinterest and other card sites. Whatever did we do without a computer in the middle of the night?  LOL.  After reading for an hour and looking at the incoming blog feed posts for the past week, I got inspired to post a couple of Autumn cards I made.  They are fairly simple, but just wanted friends to know I was thinking of them.

(1)  Free image downloaded and sized for a card. Tim Holtz pin and acrylic tag on which I cut out and glued an apple, copper metallic baker's twine.


Click to enlarge

(2)  The background was made with sponging TH inks then overstamping with several leaf stamps on brown dotted paper. Snoopy image was coloured with Copic markers, popped up with foam tape. I cut out a few leafs and sponged with TH inks. Bow, brad and baker's twine.


(3)  I used TH Harlequin stencil to sponge rust and black pattern over dotted paper. Image is from Crafty Secrets. Some TH tiny seasonal word stickers, rub-ons (corner border and spider). Edge of tag was distressed and sponged with black distress ink. The spider web was stamped with black Stazon ink on self-adhesive acrylic, edged with black stickles over the design, and cut out. The medallion is from a 12x12 sheet of halloween paper which I cut several so I could cut and layer. I stamped and embossed with black EP the magic potion phrase, glued on 31 and dotted black stickles around the edge. Pom pom black ribbon for the bottom and different ribbons for the top.


(4)  The image is by Stampendous, stamped with Versamark, and embossed with black EP. The pumpkins were coloured with Copic markers, then I placed a mask over them and sponged TH distress inks to make the night sky and grass.  Bat die is covered with black Stickles glitter. I made another medallion from the same sheet of paper as in above post and edged with black Stickles. Pompom ribbon at the bottom.


I am working on a Christmas project for my daughter. Will post it when finished. Well, I am going to go to bed and see if I can get an hour sleep before the alarm rings for my husband to get up for work. Nighty Night or Good Morning? LOL

Sharon
Nov. 15/2015

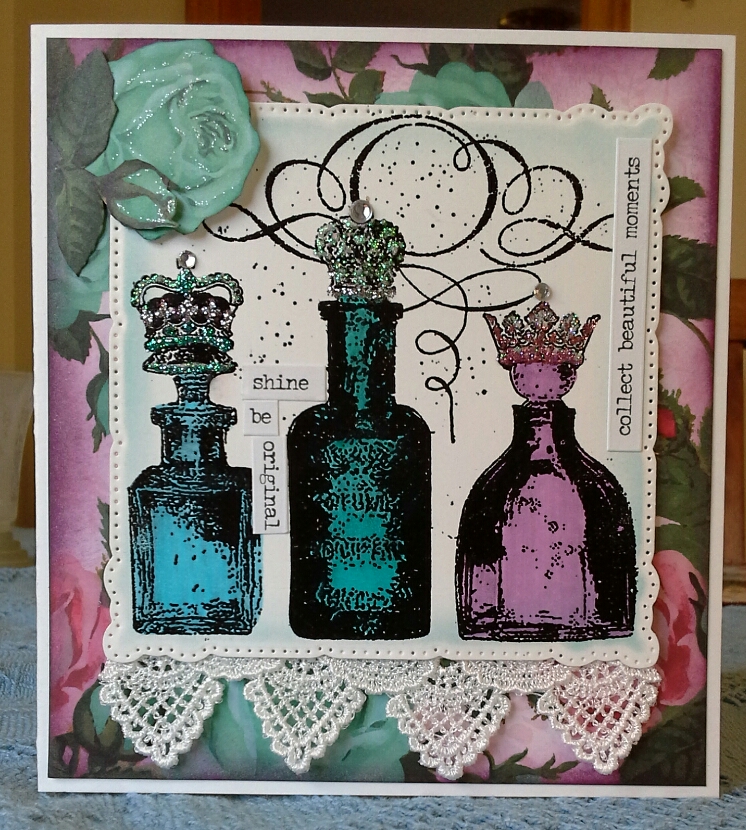
Birthday Card - Perfume Bottles

This is another card I created in October for a friend's birthday at the end of the month.

The image by Stampendous (Three Gifts #CRW064) was embossed in black EP, coloured with Copic Markers, then cut out with a Spellbinders die. I placed little chitchat words and phrases by Tim Holtz around some of the bottles for "inspiration quotes".  I applied tons of Stickles glitter and a rhinestone to each of the tops of the bottles for feminine bling. Added some vintage lace to the bottom. The image is popped up with foam tape

The rose background paper is a sheet from a 12X12" paper pad "Tea Party" by Craftsmith, sponged on the edge with TH Seedless Preserves distress ink. I fussy cut out one of the roses, rosebud and some leaves, added Stickles glitter and placed it in the upper right corner.

click to enlarge

Now I'm all up-to-date with posting. I'm working on a Christmas frame for my daughter - will post that when it is finished.  Have a great day!

Sharon
Nov.16/2015


Spring Chick


Spring is very late coming to Nova Scotia. We still have 3 to 3-1/2 feet of snow in our backyard; however, with the warm sun today, I can see that the snowbank has receeded slightly. There is a tiny bit of grass at the edge of the front walkway. The poor robins have been scrounging in that little area for food. I put out bits of apple today and they gobbled it up!

I made this spring card with a stamp from Stampendous - love the sweet little chick all dressed up in her flowery bonnet. Lots of flowers in the background paper, and I also added a few to bring out the colours in the paper, and a leaf sprig (Quickutz die). The Spellbinders Opulent Ovals border frame is sponged with TH Tumbled Glass and a touch of Faded Jeans distress ink and covered in Rock Candy dry glitter added on with "heat & stick" embossing powder.  There is a touch of Rock Candy Stickles glitter on the flowers as well. The lattice in the background is a Spellbinders Shapeabilities Expandable die.  Inside the card, I used another Stampendous stamp "Happy Spring" (very vintage with filigrees all around the words). A big faux silk bow completes the upper corner. I hope all the bright colours will bring a touch of spring to my friend.

Sorry, the photo is a little over-exposed. It was such a dark day when I made the card. Then the sun came out briefly and I rushed to get a pic, so I could get the card in the mail.

click to enlarge


Happy Spring everyone!
Sharon
April 9, 2015

Challenges:

Simon Says Stamps - April Flowers

Party Time Tuesday - Anything Goes

Couple of Cards

I haven't posted in a while. Here are two cards I made recently.

My neighbour's husband passed away on the weekend, so I had a sympathy card to make which I always find difficult, especially a masculine one. For the background I embossed the Inkadinkadoo tree image with black EP, then sponged over with distress inks to create the grass and sunset sky. Added some gold corner stickers, and popped up the layer with foam tape. Embossed the verse at the bottom with black detail EP and added some gold string.  Simple, but I hope it's suitable.

The other card is created with found items from my stash box. The Stampin' Up label layer was created some time ago to use up distress inks left on my silicone mat from doing a Tim's tag.  I have a bag of them cut with ivory and white cardstock, so I just grabbed one and swiped it over the inks. Who knows when it might come in handy?  Well, it did for this card!  I also found the larger brown flower (TH Tattered Floral die) to which I added another smaller diecut daisy flower. The verse is embossed with copper EP. The blue border is also a diecut from my stash.  I cut another layer from dotted Bo Bunny paper and did the corners with a decorative corner punch. Added some gingham ribbon at the top of flower, and edged cream base with TH Honey.  This card made up quickly because of all the found items and I will send it to a friend for her birthday in April.

click to enlarge

Sharon
March 31/2015

Birthday Card

I made this birthday card for a friend who has her own line of cream made from beeswax and, naturally, she loves bees!


On the bee background paper, I used a hexagon stencil and lightly sponged TH Wild Honey to faintly resemble honeycomb. On the bottom I used an EK Success border punch. This is layered on a gold dotted black layer.

I used a new Cuttlebug die by Anna Griffin "Flourish Medallion" (bottom layer), and a Spellbinders die "Opulent Ovals"  to create the top layer which is popped up with foam tape. I cut another centre layer in cream cardstock which I sponged on the edge with TH Wild Honey. The verse, embossed in fine black EP, is from a set of Just Rite stamps " Botanical Butterflies", and the little bee is an embellishment from my stash. The dotted flight path stamp is one I've had for a long time - can't say who makes it.

I created the flower from a Joy Crafts daisy die, sponged with TH Wild Honey, a gold brad and a little stickles glitter in the centre. This is mounted on a gold thread/jute string bow.

That's all for today. Thanks for stopping by!

Sharon
March 13, 2015

Challenges