I haven't been on my blog much the past week and a half, and I was surprised to learn from my friend Marilyn that my butterfly card was chosen as Top Three at The Butterfly Challenge for Challenge #51. Wahoo!
Thank you very much to the design team who voted for me!
Sharon
April 8, 2016


Butterfly Birthday Card
I recently bought a new set of stamps by Tim Holtz, "Flower Garden", which I used for the background of this card for a long time friend. Her birthday was this past weekend - now I'm able to post the card here and not worry about ruining the surprise. LOL!

I decided to try a new-to-me technique - watercolouring with distress inks. For the base, I used Stampin' Up Ivory Natural paper. It has flecks of fibre in it, and is not quite as stiff as regular cardstock, almost like a thin watercolour paper. Then I stamped some of the chrysanthemum flowers and stems in Archival Black ink. I patted the following distress inks on my silicone mat for my "palette", spritzed with water and painted - Scattered Straw. Wild Honey, Tea Dye, Spiced Marmalade, and Crushed Olive. I masked off the flowers and overstamped with Tim's "Papillion" large background stamp in Archival coffee ink. The last step - spritzing some random dots with a spray tool and TH walnut stain marker.
Now I started the layering....I embossed the Just Rite verse on vellum with black EP, and trimmed the edge with fancy edge scissors. At first I used brown EP; however, it didn't stand out as well as the black. I cut a piece of lattice (Spellbinders shapeabilities die) sponging over with Antique Linen ink. Added a piece of green satin vine ribbon by May Arts.
The butterfly is a Sizzix Bigz Texture Fades TH die, which has two butterflies and the matching embossing folder. I sponged Scattered Straw, Tea Dye and Brushed Corduroy over the raised embossed areas, painting the dots on the top of the wings with white gel marker. Spritzed over the whole piece with Perfect Pearls spray "Biscotti" for a touch of sheen.The body is done with Finnibair "Pollen" micro beads. Also added antennae which I created with wire nose pliers.
Finished the card with some flowers I had in my stash, however I did sponge the edges with Spiced Marmalade ink. All paper layers were distressed, and the outside edge of the vanilla cardstock was also sponged with Spiced Marmalade.
My friend is a horticulturalist, has her own landscaping business, and she has her own line of body creams made from local honey, "Naturally Nancy's". Here's a shout out to you Nancy. LOL
 Spring is almost here in Nova Scotia. I took this pic on Saturday of a few of my crocus poking through the snow in the garden by the back door. With the sun yesterday, they were in bloom, just in time for Easter. Lots more yet to come!
Sharon
March 28, 2016
Challenges:
Fashionable Stamping Challenge: #109 Butterflies
Butterfly Challenge: Butterfly + Margin
Allsorts Challenge: Wings
 |

I decided to try a new-to-me technique - watercolouring with distress inks. For the base, I used Stampin' Up Ivory Natural paper. It has flecks of fibre in it, and is not quite as stiff as regular cardstock, almost like a thin watercolour paper. Then I stamped some of the chrysanthemum flowers and stems in Archival Black ink. I patted the following distress inks on my silicone mat for my "palette", spritzed with water and painted - Scattered Straw. Wild Honey, Tea Dye, Spiced Marmalade, and Crushed Olive. I masked off the flowers and overstamped with Tim's "Papillion" large background stamp in Archival coffee ink. The last step - spritzing some random dots with a spray tool and TH walnut stain marker.
Now I started the layering....I embossed the Just Rite verse on vellum with black EP, and trimmed the edge with fancy edge scissors. At first I used brown EP; however, it didn't stand out as well as the black. I cut a piece of lattice (Spellbinders shapeabilities die) sponging over with Antique Linen ink. Added a piece of green satin vine ribbon by May Arts.
The butterfly is a Sizzix Bigz Texture Fades TH die, which has two butterflies and the matching embossing folder. I sponged Scattered Straw, Tea Dye and Brushed Corduroy over the raised embossed areas, painting the dots on the top of the wings with white gel marker. Spritzed over the whole piece with Perfect Pearls spray "Biscotti" for a touch of sheen.The body is done with Finnibair "Pollen" micro beads. Also added antennae which I created with wire nose pliers.
Finished the card with some flowers I had in my stash, however I did sponge the edges with Spiced Marmalade ink. All paper layers were distressed, and the outside edge of the vanilla cardstock was also sponged with Spiced Marmalade.
My friend is a horticulturalist, has her own landscaping business, and she has her own line of body creams made from local honey, "Naturally Nancy's". Here's a shout out to you Nancy. LOL

Sharon
March 28, 2016
Challenges:
Fashionable Stamping Challenge: #109 Butterflies
Butterfly Challenge: Butterfly + Margin
Allsorts Challenge: Wings
Valentine from friend
This lovely valentine from my friend Marilyn of Crafts and Beyond blog was a surprise in my mail last week. The verse on the tag (by Quietfire Designs) is a beautiful quotation from Dickens. The tag holder design along with the tag itself, the lattice diecut by Tim Holtz, and all the hearts and lace makes such a pretty card.
Thanks ever so much dear friend!
Sharon
Feb.21/2016
Thanks ever so much dear friend!
 |
| click to enlarge |
Sharon
Feb.21/2016
Valentine for friend
This is a Valentine card I made for a friend.

The image is cut with a Heart Spellbinder die from a sheet of 12x12 paper with different vintage images. I coloured the image heart with Cinnamon Twinkling H20 paint and also the little bit of paint on the girl's palette. Then I edged the heart with Red Stickles glitter. On the background paper, there are random hearts (Ranger Clear Medium gel paste coloured with a tiny bit of Barn Door refill distress ink, applied through the Tim Holtz Heart stencil).
I layered other diecut hearts, some heart gem embellishments, a heart border cut from blue dotted paper (to match the girl's dress), and some red rickrack ribbon. The verse is by Hampton Arts, cut out with a Spellbinders die and given a heart gem. I purposely went off the edge of the layers with a heart and the verse to give some visual variety.
As with most of my cards, I kept it fairly flat for mailing.
Thanks for stopping by today!
Sharon
Feb. 10/2016
Challenges:
Little Red Wagon#328 Valentines
Dies R Us - Love
Just us Girls Word Week - Valentine
 |
| click to enlarge |

The image is cut with a Heart Spellbinder die from a sheet of 12x12 paper with different vintage images. I coloured the image heart with Cinnamon Twinkling H20 paint and also the little bit of paint on the girl's palette. Then I edged the heart with Red Stickles glitter. On the background paper, there are random hearts (Ranger Clear Medium gel paste coloured with a tiny bit of Barn Door refill distress ink, applied through the Tim Holtz Heart stencil).
I layered other diecut hearts, some heart gem embellishments, a heart border cut from blue dotted paper (to match the girl's dress), and some red rickrack ribbon. The verse is by Hampton Arts, cut out with a Spellbinders die and given a heart gem. I purposely went off the edge of the layers with a heart and the verse to give some visual variety.
As with most of my cards, I kept it fairly flat for mailing.
Thanks for stopping by today!
Sharon
Feb. 10/2016
Challenges:
Little Red Wagon#328 Valentines
Dies R Us - Love
Just us Girls Word Week - Valentine
Grungy Valentine Tag
 |
| click to enlarge |

On a kraft tag, I sponged Pumice Stone distress ink over Tim's doily stencil. Then using the TH heart stencil, I painted in a few hearts with Cinnamon Twinkling H20 paint. The paint has a sheen which doesn't show in my picture. I stamped a heart scroll border along with bottom with Fired Brick, distressed the edge, then sponged Fired Brick and Pumice Stone along all the edges.
The love tag and date (2,heart,14) are from my stash. I think they might by Authentique paper? I slightly sponged over them with Antique Linen to age, and sponged along the edges with Pumice Stone ink. On the love tag, I overstamped with a french script stamp in Pumice Stone, and adhered a red heart embellishment. The red heart on the date tag was outlined with Red Stickles glitter.
The red doily heart is by Cottage Cutz, and I used several other hearts - gold stickers, and a heart cut from red glitter paper.
The little centre heart is a plastic ribbon tag that I coated with very light beige acrylic paint, and stamped the verse in Memories Black ink. Luckily I had two of them, because the first one I didn't have the script centered evenly. It is an Impression Obsession stamp "Friends Heart" that was one of the first valentine stamps I bought years ago - the script fit the tag perfectly! Then I went along the edge with gold distress paint daubber, added a gold locket sticker and ribbon.
Finally, I cut a lock and key out of grunge paper (TH mini alteration die) and applied his "rusted grunge" technique using Pumice Stone distress embossing powder, Ground Expresso ink, and Gold distress paint daubber.
A bit of light cream crocheted lace finishes off the bottom of the tag.
Another storm is on the way with up to 30 cm's for our northern area in Nova Scotia - it seems every weekend since mid- January we've been hit with snow! Last Friday night we had 43 cm's of heavy wet snow causing a lot of power failures. Thankfully it rained on Wednesday reducing the snowbanks.
We have plans to go out to dinner tonight with friends to celebrate my birthday. It is already starting to freezing rain, so am keeping fingers crossed for later.
Sharon
Feb. 5, 2016
Challenges:
Tim Holtz Tags of 2016 February - technique remix
Anything but Cute: Grungy Love
Simon Say Wednesday Challenge: Have a heart
Valentine Tag
I have a friend in Windsor, Nova Scotia who is an avid reader and she likes to use my tags for bookmarks. She also likes vintage things and writes/types poetry, so I thought this antique typewriter die by Tim Holtz would be "right up her alley"! I didn't use too many embellishments because if the tag is too thick it won't stay in the book properly.
 |
| click to enlarge |

The background is a Cuttlebug embossing folder "Fantasy Floral" done on red Bazzill paper. On the raised areas I sponged over with Tim Holtz Fired Brick ink, then a spritz of Heritage Gold Perfect Pearls spray.
The typewriter is cut out of black TH Coredination kraft paper, and the edges sanded. I used a fine watercolour brush to colour the gold areas with distress paint. I also put a very thin line of foam tape under the keys to pop them up a bit giving extra dimension to the typewriter. The little verse tag is one I had in my paper stash - I just sponged some Antique Linen distress ink around the edge to age.
I used one of Tim's chit chat kraft stickers, and acrylic facet to make the tag at the top. Added some red rickrak ribbon, and also another sticker at the bottom, along with a couple of heart gems.
I used one of Tim's chit chat kraft stickers, and acrylic facet to make the tag at the top. Added some red rickrak ribbon, and also another sticker at the bottom, along with a couple of heart gems.
Nova Scotia is having another winter storm... 25 to 40 cm's expected. I just got in from shovelling and it is already knee deep, heavy wet snow. My husband is away to a curling bonspeil until Sunday, so I'm going to have to clear it all myself. Not looking forward to tomorrow when the plow goes by and puts it all back in front of the driveway!
Sharon
Just A Note From Me to You Happy Mail
This is another happy mail card I recently sent to a friend in the States who had cataract Toric Lens implant eye surgery on Jan. 4th. She was very nervous about it, but says that her vision is so bright and clear now, and feels blessed that technology has lifted the "fog" of her sight.
I used papers from a 12x12 paper pad called "Tea Party" . The yellow layer was cut on the corner with a Tim Holtz mixed media die which reflects the same pattern as on the paper. The edges were sponged with Broken China distress ink. The circle image is a Just Rite stamp coloured with watercolour pencils, Gold Stickles glitter on the centre of flowers, and this is layered on another lacey circle (spellbinders die cut from the same rose paper as the background). Sorry for the photo quality - I took the pic at night because I wanted to walk to the mail box and get the card in the mail. The yellow is actually a nice rich buttercup yellow - looks faded here from the flash.
The butterfly die from Memory Box is also from the same paper pad. I positioned the bottom layer die over a rosebud for the main body of the butterfly with the gold shiny paper extending out to the wings, and the top layer is a scrap of the same pink & blue rose background paper.
A wide sheer ribbon bow finishes the card.
Last night was wild weather night - high winds gusting to 100 km's, and heavy rain which took away all our snow. Power was out in parts of our area of Town; however, we were fortunate we didn't lose ours . The sun is now trying to peek out of the dark clouds and it is very mild. Tomorrow the temperature is supposed to drop again and snowflurries. Crazy weather!
Thanks for popping to read my blog and I enjoy reading your comments.
Sharon
Jan. 11/2016
 |
| click to enlarge |
I used papers from a 12x12 paper pad called "Tea Party" . The yellow layer was cut on the corner with a Tim Holtz mixed media die which reflects the same pattern as on the paper. The edges were sponged with Broken China distress ink. The circle image is a Just Rite stamp coloured with watercolour pencils, Gold Stickles glitter on the centre of flowers, and this is layered on another lacey circle (spellbinders die cut from the same rose paper as the background). Sorry for the photo quality - I took the pic at night because I wanted to walk to the mail box and get the card in the mail. The yellow is actually a nice rich buttercup yellow - looks faded here from the flash.
The butterfly die from Memory Box is also from the same paper pad. I positioned the bottom layer die over a rosebud for the main body of the butterfly with the gold shiny paper extending out to the wings, and the top layer is a scrap of the same pink & blue rose background paper.
A wide sheer ribbon bow finishes the card.
Last night was wild weather night - high winds gusting to 100 km's, and heavy rain which took away all our snow. Power was out in parts of our area of Town; however, we were fortunate we didn't lose ours . The sun is now trying to peek out of the dark clouds and it is very mild. Tomorrow the temperature is supposed to drop again and snowflurries. Crazy weather!
Thanks for popping to read my blog and I enjoy reading your comments.
Sharon
Jan. 11/2016
Bottles Collage Happy Mail
This card was sent to a friend who needed some "happy mail" as she is undergoing treatment for cancer. The image is a new christmas gift stamp, made by Inkadinkadoo, stamped on watercolour paper and coloured with watercolour pencils. Unfortunately while painting the last bottle, the paint bled a bit outside the margins because the area was still wet from doing the pale blue background. I was going to throw it out and start again, but decided to cut a bottle using Tim Holtz mini die and create an aged pottery style container with crackle glaze to cover the 'boo, boo'. Even though the last bottle looks like an "odd man out", I decided to go with it.
Each bottle was given a coat of crystal glaze, and little embellishments; wine cork and wire on the green one; wire art on centre of blue one and micro beads on centre of flowers; flowers, brown pearl & leaves along with wire art on neck of yellow one; micro beads on centre of flower,and wire around neck of pink one; flower, brad & leaves along with twine on crackle glaze bottle.
The image is layered on striped paper cut with a semi-circle border punch, along with a flourish in upper corner, beige crocheted lace, and a spellbinders ribbon label popped up with foam tape
I had a Facebook note from my friend yesterday. She has it on display with some tulips on her sideboard. I was glad it made her happy!
Thanks for visiting.
Sharon
Jan. 8, 2016
Challenge:
Take a Stamp, Anything Goes: new stamp
Simon Says Wednesday Challenge: something new
 |
| click to enlarge |
 |
Each bottle was given a coat of crystal glaze, and little embellishments; wine cork and wire on the green one; wire art on centre of blue one and micro beads on centre of flowers; flowers, brown pearl & leaves along with wire art on neck of yellow one; micro beads on centre of flower,and wire around neck of pink one; flower, brad & leaves along with twine on crackle glaze bottle.
The image is layered on striped paper cut with a semi-circle border punch, along with a flourish in upper corner, beige crocheted lace, and a spellbinders ribbon label popped up with foam tape
I had a Facebook note from my friend yesterday. She has it on display with some tulips on her sideboard. I was glad it made her happy!
Thanks for visiting.
Sharon
Jan. 8, 2016
Challenge:
Take a Stamp, Anything Goes: new stamp
Simon Says Wednesday Challenge: something new
Winter sunset scene - Make your Own Background
This card will be for my daughter's in-laws who have a little cabin in the woods, very remote and isolated in a heavy snow area - no running water or electricity. When Julie and husband Jeff went winter camping a few years ago, they took the skidoo up the mountain road and snowshoed into the cabin. They were walking on the snow at the top of window height level! Jeff had to shovel down to get into the door. There is a generator and Jotul wood stove, so once it gets warm, it is nice and cozy. They often hear coyotes howling in the nightime. There are a lot of sugar maple trees on the property and in the Autumn season, the mountain is ablaze with all the red and gold leaves. Actually, it is beautiful there in all seasons!
For the background, I sponged TH inks (Spiced Marmalade, Wild Honey, Chipped Sapphire, Worn Lipstick and Dusty Concorde...in that order) on specialty paper creating a winter sunset sky. I really like this product by Ranger as it allows you to "move" the sponged inks ensuring good blending. The ink doesn't soak into the cardstock immediately upon application. I gave a quick burst with the heat gun to ensure everything was dry before stamping the trees with Versamark, applying detail black EP and heat embossing. Hint.... If the distress inks are even slightly wet, they will pick up embossing powder and ruin your image! Finally, I gave a quick burst with TH Picket fence distress spray to look like snow in the air.
I cut a white "snow hill" layer of paper for the bottom section and created snow hills with distress inks. The white trees have an application of Deco Art snow and Stickles glitter, and the large one is popped up with foam tape. Stamped the verse on the very bottom with Archival black ink.
The coyote was cut from gray cardstock. Then I sponged Walnut Stain distress ink over his back and haunches creating dimension to the body. Gave a light touch of white pen to his tail and front of chest. Now he looks more like a real coyote than a flat gray diecut.
Well, I think I captured the feeling of the winter scenery around the little cabin in the woods and a sunset winter sky.
Thanks for popping in and I love reading all your comments. They are truly appreciated!
Sharon
Dec. 14, 2014
Products Used:
- Ranger Specialty Stamping Paper
- Tim Holtz Distress Inks
- Hero Arts "Winter Trees Pattern" wood stamp
- Tim Holtz Picket Fence distress spray
- Impression Obsesssion dies - Fir Trees
- Deco Art Snow Painter
- Stickles Glitter Star Dust
- Verse stamp - Daniel Johnson 2006 - set of holiday verses
- PoppyStamps Inc. die - "Fine Foxes" (but I think it can also be a coyote LOL!)
- Recollections Mercury Glass paper - silver
Challenges:
Fashionable Stamping Challenges - Create your own background - winter sky
Craft Stamper - December Take a Technique - distress ink sponged sky background
Little Red Wagon - Snow much fun
 |
| click to enlarge |
I cut a white "snow hill" layer of paper for the bottom section and created snow hills with distress inks. The white trees have an application of Deco Art snow and Stickles glitter, and the large one is popped up with foam tape. Stamped the verse on the very bottom with Archival black ink.
The coyote was cut from gray cardstock. Then I sponged Walnut Stain distress ink over his back and haunches creating dimension to the body. Gave a light touch of white pen to his tail and front of chest. Now he looks more like a real coyote than a flat gray diecut.
Well, I think I captured the feeling of the winter scenery around the little cabin in the woods and a sunset winter sky.
Thanks for popping in and I love reading all your comments. They are truly appreciated!
Sharon
Dec. 14, 2014
Products Used:
- Ranger Specialty Stamping Paper
- Tim Holtz Distress Inks
- Hero Arts "Winter Trees Pattern" wood stamp
- Tim Holtz Picket Fence distress spray
- Impression Obsesssion dies - Fir Trees
- Deco Art Snow Painter
- Stickles Glitter Star Dust
- Verse stamp - Daniel Johnson 2006 - set of holiday verses
- PoppyStamps Inc. die - "Fine Foxes" (but I think it can also be a coyote LOL!)
- Recollections Mercury Glass paper - silver
Challenges:
Fashionable Stamping Challenges - Create your own background - winter sky
Craft Stamper - December Take a Technique - distress ink sponged sky background
Little Red Wagon - Snow much fun
Faith Card
I had a request from my elderly neighbour to make a faith based Christmas card, fairly flat as she is mailing it abroad. She didn't want bows or anything too "frou, frou". I didn't know what I was going to create when I agreed, but I knew I had some angel stamps. Well, I found a stamp in my craft cupboard that must be at least 8 or 9 years old, which I had forgotten about.
I seem to be giving love to a lot of my older stamps this season...LOL...however, I think it fits the request perfectly!

I created the background with TH distress inks by patting Wild Honey, Chipped Sapphire and Dusty Concord on a silicone mat, spritzing ever so lightly with water, then placing the cardstock on top to absorb the colour. I had pre-planned where I wanted the colour to be such as yellow mostly where the stars were located, and each angel a different colour. The first one came out too wet and the colours too diluted. The second one was exactly what I was going for! Then I spritzed again lightly with Glimmer Mist Heritage Gold. After the background was totally dry, I swiped the stamp with Versamark, and heat embossed the image with fine black powder.
I added a Northern Star cut from sparkly gold paper. Image is layered on gold paper.
I will give my neighbour the card tomorrow and hope it meets with her approval. Thanks for stopping by!
Products Used
- Ranger Specialty Stamping Paper
- Tim Holtz Distress Inks
- Tin Can Mail wooden stamp
- The Frantic Stamper die "Northern Star"
Sharon
Dec.13,2015
Challenges:
Our Creative Corner - Stars
Craft Stamper - Take a technique and Share the Season
(distress ink "marble effect" background)
I seem to be giving love to a lot of my older stamps this season...LOL...however, I think it fits the request perfectly!
 |
| Click to enlarge |

I created the background with TH distress inks by patting Wild Honey, Chipped Sapphire and Dusty Concord on a silicone mat, spritzing ever so lightly with water, then placing the cardstock on top to absorb the colour. I had pre-planned where I wanted the colour to be such as yellow mostly where the stars were located, and each angel a different colour. The first one came out too wet and the colours too diluted. The second one was exactly what I was going for! Then I spritzed again lightly with Glimmer Mist Heritage Gold. After the background was totally dry, I swiped the stamp with Versamark, and heat embossed the image with fine black powder.
I added a Northern Star cut from sparkly gold paper. Image is layered on gold paper.
I will give my neighbour the card tomorrow and hope it meets with her approval. Thanks for stopping by!
Products Used
- Ranger Specialty Stamping Paper
- Tim Holtz Distress Inks
- Tin Can Mail wooden stamp
- The Frantic Stamper die "Northern Star"
Sharon
Dec.13,2015
Challenges:
Our Creative Corner - Stars
Craft Stamper - Take a technique and Share the Season
(distress ink "marble effect" background)
JOY - Addicted to CAS Challenge
The challenge at Addicted to CAS is the word Joy. I find it difficult to do "clean and simple" and I have been trying more cards with this style. Lots of white space!
I stamped the pine needle branch with TH Forest Moss distress ink and drew in the main branch with TH Brushed Corduroy marker. I patted the Forest Moss distress ink pad on a silicone mat and spritzed with water picking up the ink with a wet, fine watercolour brush drawing in more "needles".
I used an embossing folder creating swirls at the top over the pine needles and the hanging ornaments. Using a fine, flat edge 1/8" watercolour brush, I picked up some Adirondack Gold paint lightly painting over the embossed "chain" and top of ornaments. The ornaments were edged with Stickles Star Dust and Gold glitter.
The word JOY is a Tim Holtz die cut from gold paper that resembles mercury glass. I picked up a whole pad of this 12x12" paper with red, gold, silver and copper shades of mercury glass the other day at Michael's for half price! It is so pretty and I'm sure next Christmas season I'll get a lot of use from it!!
At last minute I added the tiny gold, cord bows. I just couldn't help myself....LOL! I'm not sure if this is agreeable to the challenge rules, so if it doesn't meet the requirements, the judges can eliminate my entry.
Well, it's getting down to the deadline of mailing cards. I have two more to make, then I'll be done for this year. I have nothing planned for today but being in my craftroom creating, then massive clean-up of all my christmas stuff which has exploded to every surface. LOL!

Enjoy your weekend!
Supplies Used:
- Crafts Too Embossing Folder - Swirl Baubles
- Hero Arts #H2887 "Real Pine"
- Tim Holtz Forest Moss Distress Ink & Brushed Corduroy Marker
- Ranger Adirondack Gold Paint Dauber
- Tim Holtz Thinlit Dies - Holiday Words
- Stickles Glitter Star Dust & Gold
- Recollections Christmas/Noel Mercury Glass 12x12 pad & gold cord
Sharon
Dec. 12, 2015
 |
| click to enlarge |
I stamped the pine needle branch with TH Forest Moss distress ink and drew in the main branch with TH Brushed Corduroy marker. I patted the Forest Moss distress ink pad on a silicone mat and spritzed with water picking up the ink with a wet, fine watercolour brush drawing in more "needles".
I used an embossing folder creating swirls at the top over the pine needles and the hanging ornaments. Using a fine, flat edge 1/8" watercolour brush, I picked up some Adirondack Gold paint lightly painting over the embossed "chain" and top of ornaments. The ornaments were edged with Stickles Star Dust and Gold glitter.
The word JOY is a Tim Holtz die cut from gold paper that resembles mercury glass. I picked up a whole pad of this 12x12" paper with red, gold, silver and copper shades of mercury glass the other day at Michael's for half price! It is so pretty and I'm sure next Christmas season I'll get a lot of use from it!!
At last minute I added the tiny gold, cord bows. I just couldn't help myself....LOL! I'm not sure if this is agreeable to the challenge rules, so if it doesn't meet the requirements, the judges can eliminate my entry.
Well, it's getting down to the deadline of mailing cards. I have two more to make, then I'll be done for this year. I have nothing planned for today but being in my craftroom creating, then massive clean-up of all my christmas stuff which has exploded to every surface. LOL!

Enjoy your weekend!
Supplies Used:
- Crafts Too Embossing Folder - Swirl Baubles
- Hero Arts #H2887 "Real Pine"
- Tim Holtz Forest Moss Distress Ink & Brushed Corduroy Marker
- Ranger Adirondack Gold Paint Dauber
- Tim Holtz Thinlit Dies - Holiday Words
- Stickles Glitter Star Dust & Gold
- Recollections Christmas/Noel Mercury Glass 12x12 pad & gold cord
Sharon
Dec. 12, 2015
Honourable Mention
Good Morning:
I was just checking my email when I noticed a post from Pamellia of Anything But Cute Ornamental Challenge saying I was an Honourable Mention with my "Night Before Christmas Frame".
I was so surprised because the talent on this group in all the entries was AMAZING. I know this word gets overused, but you have to check the entries. Some of the creations (ornaments, houses, villages, ferris wheels)are all made of paper Wowsers!!!
Thank you so much to the judges. I will proudly display the challenge badge,and look forward to future challenges.
Sharon
December 12, 2015
I was just checking my email when I noticed a post from Pamellia of Anything But Cute Ornamental Challenge saying I was an Honourable Mention with my "Night Before Christmas Frame".
I was so surprised because the talent on this group in all the entries was AMAZING. I know this word gets overused, but you have to check the entries. Some of the creations (ornaments, houses, villages, ferris wheels)are all made of paper Wowsers!!!
Thank you so much to the judges. I will proudly display the challenge badge,and look forward to future challenges.
Sharon
December 12, 2015
Ornament cards
Here are two cards using the Tim Holtz Carved Ornaments die I made this morning. I have gotten behind in creating cards, so I might do a few more of these as they make up fairly quickly!
I stenciled the snowflake pattern on the diecut with distress ink. Next I completely covered the diecut with Versamark ink, sprinkled with sparkle powder and heat embossed to give a shiny glass-like finish to the whole piece. I added a snowflake diecut, a jewel embellishment, some ribbon trim and silver cording to tie them to a pine branch border diecut. The embossed swirl pattern on the bottom is a cuttlebug folder. I thought about adding Stickles glitter to the pine boughs and snowflake on the ornament, but then decided I liked the "clean" look. The sparkle in the embossing on the ornament is hard to photograph but when held sideways there is the hint of it!
I think I like the blue one the best!
Products Used:
Tim Holtz Carved Ornaments Movers & Shapers Die
Memory Box stencil " Snowflake Lace"
Cheery Lynn - Snowflake 5
Memory Box - "Pine Needle Border"
CuttleBug - "Scrollwork" embossing folder
Tim Holtz China Blue and Festive Berries distress ink
Ranger Polysparkle embossing powder
Thanks for stopping by and I always enjoy reading your comments!
Sharon
December 8, 2015
Challenges:
Try it on Tuesday - Snowflakes and Winter Whites
Diecuts R Us - Challenge #38 Christmas
Simon Says Monday Challenge: - Christmas
I stenciled the snowflake pattern on the diecut with distress ink. Next I completely covered the diecut with Versamark ink, sprinkled with sparkle powder and heat embossed to give a shiny glass-like finish to the whole piece. I added a snowflake diecut, a jewel embellishment, some ribbon trim and silver cording to tie them to a pine branch border diecut. The embossed swirl pattern on the bottom is a cuttlebug folder. I thought about adding Stickles glitter to the pine boughs and snowflake on the ornament, but then decided I liked the "clean" look. The sparkle in the embossing on the ornament is hard to photograph but when held sideways there is the hint of it!
I think I like the blue one the best!
 |
| click to enlarge |
 |
| click to enlarge |
Products Used:
Tim Holtz Carved Ornaments Movers & Shapers Die
Memory Box stencil " Snowflake Lace"
Cheery Lynn - Snowflake 5
Memory Box - "Pine Needle Border"
CuttleBug - "Scrollwork" embossing folder
Tim Holtz China Blue and Festive Berries distress ink
Ranger Polysparkle embossing powder
Thanks for stopping by and I always enjoy reading your comments!
Sharon
December 8, 2015
Challenges:
Try it on Tuesday - Snowflakes and Winter Whites
Diecuts R Us - Challenge #38 Christmas
Simon Says Monday Challenge: - Christmas
Winter Wishes
I made this card for my crafting friend Marilyn (Crafts & Beyond blog). We had lunch, exchanged our Christmas gifts & cards, had a good hour and a half gab session ending with a warm brownie & chocolate sauce dessert, and a bit of shopping. Living a couple of hours from each other, it's always good to get together! Marilyn, we are definitely long overdue for a crafting technique weekend.

The base was made by spreading Ranger Texture Paste over the whole surface of a 4x6" stencil by Memory Box -"Snowflake Lace", and sprinkling some Stampendous Frantage Chunky Enamel White embossing powder over the wet paste. Once the paste was dried, I lightly heated the EP. You have to be careful aiming the heat gun - if heat stays too long on one spot, the paste will bubble. Actually, if I were to do this technique again, I wouldn't use as much EP as I lost a lot of the snowflake pattern. The effect reminds me of tiny hail balls.
The large snowflake is a wooden stamp I've had for at least 10 years. It's always good to give favourite stamps some love every now and then LOL! I stamped with Versamark and embossed with Wow Metal Rhodium Sparkle powder. This stuff has so much shine...wish I could have captured it in the photo! Also added Star Dust Stickles glitter. I put some frayed silver, wide mesh ribbon fibres, and loops of silver cording underneath the snowflake. The flower (from Micheal's) has Stickles Silver, Platinum and Star Dust glitter and a sparkly centre jewel embellishment.
The little tag is a Spellbinders die, and words cut from glitzy silver Stampin'Up! paper are Tim Holtz Holiday Word Script dies. The blue jingle bells music paper was spritzed all over with TH Picket Fence Distress Spray.
We are going to a Christmas party tomorrow night, and Pancake & Sausage Breakfast with Santa on Saturday morning with our daughter , her husband and 3 year old grandson. This is an annual fund-raiser for the local Help Line. Then the high school band Christmas Concert is on Sunday afternoon. Our daughter was in the band, Honour Choir and Jazz Choir all through middle school & high school. Of course, it was a "given" that we attend the concerts. We no longer know any of the kids, but we always appreciate and enjoy listening to holiday music they have spent many hours practicing. 'Tis the Season! (busy, busy busy.....)
Thanks for popping in to read my blog, and have a great weekend.
Sharon
Dec. 3, 2015
Frilly & Funkie: 'Tis the Season
Papertake Weekly - Anything Goes
ABC Challenge - W is for Wishes
Simon Says Wednesday Challenge: Let it Snow
 |
| click to enlarge |

The base was made by spreading Ranger Texture Paste over the whole surface of a 4x6" stencil by Memory Box -"Snowflake Lace", and sprinkling some Stampendous Frantage Chunky Enamel White embossing powder over the wet paste. Once the paste was dried, I lightly heated the EP. You have to be careful aiming the heat gun - if heat stays too long on one spot, the paste will bubble. Actually, if I were to do this technique again, I wouldn't use as much EP as I lost a lot of the snowflake pattern. The effect reminds me of tiny hail balls.
The large snowflake is a wooden stamp I've had for at least 10 years. It's always good to give favourite stamps some love every now and then LOL! I stamped with Versamark and embossed with Wow Metal Rhodium Sparkle powder. This stuff has so much shine...wish I could have captured it in the photo! Also added Star Dust Stickles glitter. I put some frayed silver, wide mesh ribbon fibres, and loops of silver cording underneath the snowflake. The flower (from Micheal's) has Stickles Silver, Platinum and Star Dust glitter and a sparkly centre jewel embellishment.
The little tag is a Spellbinders die, and words cut from glitzy silver Stampin'Up! paper are Tim Holtz Holiday Word Script dies. The blue jingle bells music paper was spritzed all over with TH Picket Fence Distress Spray.
We are going to a Christmas party tomorrow night, and Pancake & Sausage Breakfast with Santa on Saturday morning with our daughter , her husband and 3 year old grandson. This is an annual fund-raiser for the local Help Line. Then the high school band Christmas Concert is on Sunday afternoon. Our daughter was in the band, Honour Choir and Jazz Choir all through middle school & high school. Of course, it was a "given" that we attend the concerts. We no longer know any of the kids, but we always appreciate and enjoy listening to holiday music they have spent many hours practicing. 'Tis the Season! (busy, busy busy.....)
Thanks for popping in to read my blog, and have a great weekend.
Sharon
Dec. 3, 2015
Frilly & Funkie: 'Tis the Season
Papertake Weekly - Anything Goes
ABC Challenge - W is for Wishes
Simon Says Wednesday Challenge: Let it Snow
Santa Claus is Coming to Town - Ornamental Christmas Frame
Over at Anything But Cute, the challenge for the past month is "It's Ornamental", deadline Dec.5th.
I created this project for my daughter which I called "Santa Claus is Coming to Town". The picture of my grandson Connor with a cookie for Santa, taken last year on Christmas Eve, is pretty cute so I hope this doesn't disqualify my entry LOL!
I started off with a 6"x12" frame from the Dollar Store which had a saying on it in black paint on burlap. I bought it thinking this is a good size for something creative - not too large. So many times I bring things home to re-purpose them and they end up sitting in my craft cupboard. This one was only two days in the house and I had an idea!!!! I took out the saying that was inside the frame replacing it with new burlap.
Over the burlap I patted Ranger Texture Paste through the Festive stencil by Tim Holtz. When the paste was dry, I replaced the stencil over the paste and sponged on distress inks - Fired Brick, Forest Moss, Brushed Corduroy and Tea Dye. I also applied a thick layer of Picket Fence distress paint and distress glitter around all the edges to look like snow. Here's what it looked like before I started adding all the elements.
Thanks for stopping by to take a peek at my projects!
I created this project for my daughter which I called "Santa Claus is Coming to Town". The picture of my grandson Connor with a cookie for Santa, taken last year on Christmas Eve, is pretty cute so I hope this doesn't disqualify my entry LOL!
 |
| click to enlarge |
Over the burlap I patted Ranger Texture Paste through the Festive stencil by Tim Holtz. When the paste was dry, I replaced the stencil over the paste and sponged on distress inks - Fired Brick, Forest Moss, Brushed Corduroy and Tea Dye. I also applied a thick layer of Picket Fence distress paint and distress glitter around all the edges to look like snow. Here's what it looked like before I started adding all the elements.
 |
| click to enlarge |
I re- sized the photo of Connor, glued it to cereal box cardboard, rounded the corners with a punch,and placed self-adhesive acrylic over the image to protect it, topped with a wood star and cording. There is a bit of glare on the right side from the camera because of the acrylic coating - hard to photograph.
The Santa face is a vintage cardstock sticker from Heartwarming Vintage Creative Scraps.I sponged around the edge with Tea Dye to further age. The other sayings (Santa Claus is coming to Town, and Believe) along with the pinecone 3-d stickers are from my christmas stash. I used a small tag die to cut the "24" tag, then stamped the numbers, sponged the edges and added red glitter, mounted on a TH pin. I created the pinecone using the Tim Holtz die, added some "snow" with paint and glitter. It is glued under a green crushed ribbon bow, along with some glittered leaves also from my stash. I also added some bits of Stickles glitter here and there (Santa hat, berries, leaves, etc.)
After doing this frame and the tag below in a previous post, I think I have finally mastered the Tim Holtz pinecone die. I've only had it two years and was about to sell it (from frustration!) when I gave it one more try. I still feel like I'm all "fingers" while putting it together, but at least the finished item now looks like a pinecone instead of something squished!!! Also I'm going to give the TH Festive stencil a break for this year or you all will be tired of seeing it. LOL!
After doing this frame and the tag below in a previous post, I think I have finally mastered the Tim Holtz pinecone die. I've only had it two years and was about to sell it (from frustration!) when I gave it one more try. I still feel like I'm all "fingers" while putting it together, but at least the finished item now looks like a pinecone instead of something squished!!! Also I'm going to give the TH Festive stencil a break for this year or you all will be tired of seeing it. LOL!
It was fun doing this and it didn't take all that long, except for one afternoon to do the stenciling paste. I hope my daughter likes it!
Sharon
Dec. 1, 2015
Made my Day!
I just found out that my santa and sleigh scene card made Top 5 in Try It On Tuesday Challenge, and I get a badge to put on my sidebar.
This was an extra nice surprise to end the day! Thanks so much to the judges!
Sharon
Dec. 1/15
This was an extra nice surprise to end the day! Thanks so much to the judges!
Sharon
Dec. 1/15
Merry and Bright Christmas Tag
I had a nice Sunday afternoon crafting yesterday. I put on some christmas music and finished a tag I started a few weeks ago.

For the background, I sponged a bit of Forest Moss and Shabby Shutters distress ink randomly over the surface of a kraft tag. I put some Ranger Texture Paste into four wells of an art palette and coloured each with TH reinkers - Fired Brick, Brushed Corduroy, Tea Dye, and Pine Needles. Then I spread the paste over a TH "Festive" stencil. When the paste was dry, I spritzed all over with Tattered Angels Glimmer Mist Irridescent Gold.
I cut some greenery using TH Holiday Greens thinlit dies from bits of TH Kraft-Core paper, sanding off the surface in some places and sponging with distress inks to age.
From a Brick Red Kraft-Core piece, I cut the verse Merry & Bright from TH Holiday Word Block thinlit dies, and used a scrap of kraft cardstock to place behind the cut-out words. I thought the letters "R" and B" looked funny without their defining loops , so I glued on the little bits that pop out. If you have these dies, you know what I mean...LOL! Now they look more like regular letters. I also spritzed the gold glimmer mist over and fastened it to the tag with tiny gold star brads.
I created a bow from olive crushed silk ribbon, placing loops of metallic cord behind, adding a red metal bell, a pinecone (TH die) and two little gold, styrofoam balls. I recently bought a decorative sprig from Michaels for half price, $1.50, made with these little gold and silver balls - I thought they would come in handy as they were tiny enough for card making.
A pinecone brad and ribbon at the top finishes the tag.
It snowed overnight covering the lawns and streets. Our first blanketing snow of the season!
Thanks for stopping by and reading how I made this tag.
Sharon
Nov.30,2015
 |
| click to enlarge |

For the background, I sponged a bit of Forest Moss and Shabby Shutters distress ink randomly over the surface of a kraft tag. I put some Ranger Texture Paste into four wells of an art palette and coloured each with TH reinkers - Fired Brick, Brushed Corduroy, Tea Dye, and Pine Needles. Then I spread the paste over a TH "Festive" stencil. When the paste was dry, I spritzed all over with Tattered Angels Glimmer Mist Irridescent Gold.
I cut some greenery using TH Holiday Greens thinlit dies from bits of TH Kraft-Core paper, sanding off the surface in some places and sponging with distress inks to age.
From a Brick Red Kraft-Core piece, I cut the verse Merry & Bright from TH Holiday Word Block thinlit dies, and used a scrap of kraft cardstock to place behind the cut-out words. I thought the letters "R" and B" looked funny without their defining loops , so I glued on the little bits that pop out. If you have these dies, you know what I mean...LOL! Now they look more like regular letters. I also spritzed the gold glimmer mist over and fastened it to the tag with tiny gold star brads.
I created a bow from olive crushed silk ribbon, placing loops of metallic cord behind, adding a red metal bell, a pinecone (TH die) and two little gold, styrofoam balls. I recently bought a decorative sprig from Michaels for half price, $1.50, made with these little gold and silver balls - I thought they would come in handy as they were tiny enough for card making.
A pinecone brad and ribbon at the top finishes the tag.
It snowed overnight covering the lawns and streets. Our first blanketing snow of the season!
Thanks for stopping by and reading how I made this tag.
Sharon
Nov.30,2015
Create a Scene Christmas Cards
The past two afternoons I have been playing with creating winter scenes using sponged distress inks and also watercolours, following tutorials on Penny Black YouTube videos (Heather Telford; Micheline "Mimi" Jourdain; and Jill Foster). Last winter, I played around a bit with distress inks for snow hills and moons, but creating skies with watercolours is a new one to me. I did several before having one I was pleased with...LOL! All three of the ladies say in their tutorials they don't use many embellishments on the completed card as the scene is the main focal point....I tend to agree.
Also new to me is using Windsor & Newton Art Masking Fluid. Love this stuff! You flick it on the paper with a toothbrush, before doing any inking or watercolour, and it dries rubbery resisting the medium. After you have finished your scene, rub it off with your fingers revealing white areas of "snow". It goes on beige so you can see how little or how many flecks you have.
(1) This card uses the sponged distress inks, Faded Jeans and Chipped Sapphire, for the snow and sky. The moon is masked off with a 1-1/4" inch circle while sponging. I applied the art fluid for the "snow". The tree is an old favourite one by Stampin' Up! stamped several times with Forest Moss, Pine Needles, and Crushed Olive inks. The Santa sleigh and reindeer is a die by Impression Obsession; the word "believe" is cut from mat silver cardstock using TH Holiday Word die. I also stuck on two little silver stars - one by the moon, and other for the dot on the "i" in believe. I recently read a hint on someone's blog to use stars, pearls, or a drop of stickles for the "i" , as the dot is such a tiny piece. It's very easy to lose it when you punch the word from the die. Good hint!
(2) For this card, I followed the tutorial by Jill Foster for Penny Black. She has quite a few cards using this watercolour sunset sky for all seasons of the year. I used Cotman Watercolours -yellow, orange, pink and mauve for the sky; also Payne's Grey, Burnt Umber and Phalo Blue for under the trees and snow hill. The trees were stamped with Archival inks- Library Green and Black, branches in Coffee. Snow is TH Picket Fence distress spray. I don't have any Penny Black stamps for making scenes so I used my SU tree stamp once again, and the "branches" in the middle of the card are the tips of an older cling stamp by Tim Holtz. Deer dies are by Impression Obsession to which I added a few white details on their tails, spots, and antlers. I also added the TH words "peace on earth" cut from gold cardstock and a gold star.

I did a few of these sunsets skies while I had everything out, so I have some on hand for future cards.
We had a sprinkling of snow this morning on the lawn - puts me in the seasonal mood!
Sharon
Nov. 19/2015
Challenge:
Try it on Tuesdays: Create a Scene
Simon Says Wednesday Challenge - it's Christmas
Also new to me is using Windsor & Newton Art Masking Fluid. Love this stuff! You flick it on the paper with a toothbrush, before doing any inking or watercolour, and it dries rubbery resisting the medium. After you have finished your scene, rub it off with your fingers revealing white areas of "snow". It goes on beige so you can see how little or how many flecks you have.
(1) This card uses the sponged distress inks, Faded Jeans and Chipped Sapphire, for the snow and sky. The moon is masked off with a 1-1/4" inch circle while sponging. I applied the art fluid for the "snow". The tree is an old favourite one by Stampin' Up! stamped several times with Forest Moss, Pine Needles, and Crushed Olive inks. The Santa sleigh and reindeer is a die by Impression Obsession; the word "believe" is cut from mat silver cardstock using TH Holiday Word die. I also stuck on two little silver stars - one by the moon, and other for the dot on the "i" in believe. I recently read a hint on someone's blog to use stars, pearls, or a drop of stickles for the "i" , as the dot is such a tiny piece. It's very easy to lose it when you punch the word from the die. Good hint!
 |
| Click to enlarge |
(2) For this card, I followed the tutorial by Jill Foster for Penny Black. She has quite a few cards using this watercolour sunset sky for all seasons of the year. I used Cotman Watercolours -yellow, orange, pink and mauve for the sky; also Payne's Grey, Burnt Umber and Phalo Blue for under the trees and snow hill. The trees were stamped with Archival inks- Library Green and Black, branches in Coffee. Snow is TH Picket Fence distress spray. I don't have any Penny Black stamps for making scenes so I used my SU tree stamp once again, and the "branches" in the middle of the card are the tips of an older cling stamp by Tim Holtz. Deer dies are by Impression Obsession to which I added a few white details on their tails, spots, and antlers. I also added the TH words "peace on earth" cut from gold cardstock and a gold star.

I did a few of these sunsets skies while I had everything out, so I have some on hand for future cards.
We had a sprinkling of snow this morning on the lawn - puts me in the seasonal mood!
Sharon
Nov. 19/2015
Challenge:
Try it on Tuesdays: Create a Scene
Simon Says Wednesday Challenge - it's Christmas
Autumn and Halloween
I have been very lazy about my blog, and for a while I was going to stop posting completely. Having this discussion with stamping friends, I decided to keep it going, but maybe not as detailed as previous posts. Well, tonight I couldn't sleep so decided to surf Pinterest and other card sites. Whatever did we do without a computer in the middle of the night? LOL. After reading for an hour and looking at the incoming blog feed posts for the past week, I got inspired to post a couple of Autumn cards I made. They are fairly simple, but just wanted friends to know I was thinking of them.
(1) Free image downloaded and sized for a card. Tim Holtz pin and acrylic tag on which I cut out and glued an apple, copper metallic baker's twine.
(2) The background was made with sponging TH inks then overstamping with several leaf stamps on brown dotted paper. Snoopy image was coloured with Copic markers, popped up with foam tape. I cut out a few leafs and sponged with TH inks. Bow, brad and baker's twine.

(3) I used TH Harlequin stencil to sponge rust and black pattern over dotted paper. Image is from Crafty Secrets. Some TH tiny seasonal word stickers, rub-ons (corner border and spider). Edge of tag was distressed and sponged with black distress ink. The spider web was stamped with black Stazon ink on self-adhesive acrylic, edged with black stickles over the design, and cut out. The medallion is from a 12x12 sheet of halloween paper which I cut several so I could cut and layer. I stamped and embossed with black EP the magic potion phrase, glued on 31 and dotted black stickles around the edge. Pom pom black ribbon for the bottom and different ribbons for the top.

(4) The image is by Stampendous, stamped with Versamark, and embossed with black EP. The pumpkins were coloured with Copic markers, then I placed a mask over them and sponged TH distress inks to make the night sky and grass. Bat die is covered with black Stickles glitter. I made another medallion from the same sheet of paper as in above post and edged with black Stickles. Pompom ribbon at the bottom.

I am working on a Christmas project for my daughter. Will post it when finished. Well, I am going to go to bed and see if I can get an hour sleep before the alarm rings for my husband to get up for work. Nighty Night or Good Morning? LOL
Sharon
Nov. 15/2015
(1) Free image downloaded and sized for a card. Tim Holtz pin and acrylic tag on which I cut out and glued an apple, copper metallic baker's twine.
 |
| Click to enlarge |
(2) The background was made with sponging TH inks then overstamping with several leaf stamps on brown dotted paper. Snoopy image was coloured with Copic markers, popped up with foam tape. I cut out a few leafs and sponged with TH inks. Bow, brad and baker's twine.


(4) The image is by Stampendous, stamped with Versamark, and embossed with black EP. The pumpkins were coloured with Copic markers, then I placed a mask over them and sponged TH distress inks to make the night sky and grass. Bat die is covered with black Stickles glitter. I made another medallion from the same sheet of paper as in above post and edged with black Stickles. Pompom ribbon at the bottom.

I am working on a Christmas project for my daughter. Will post it when finished. Well, I am going to go to bed and see if I can get an hour sleep before the alarm rings for my husband to get up for work. Nighty Night or Good Morning? LOL
Sharon
Nov. 15/2015
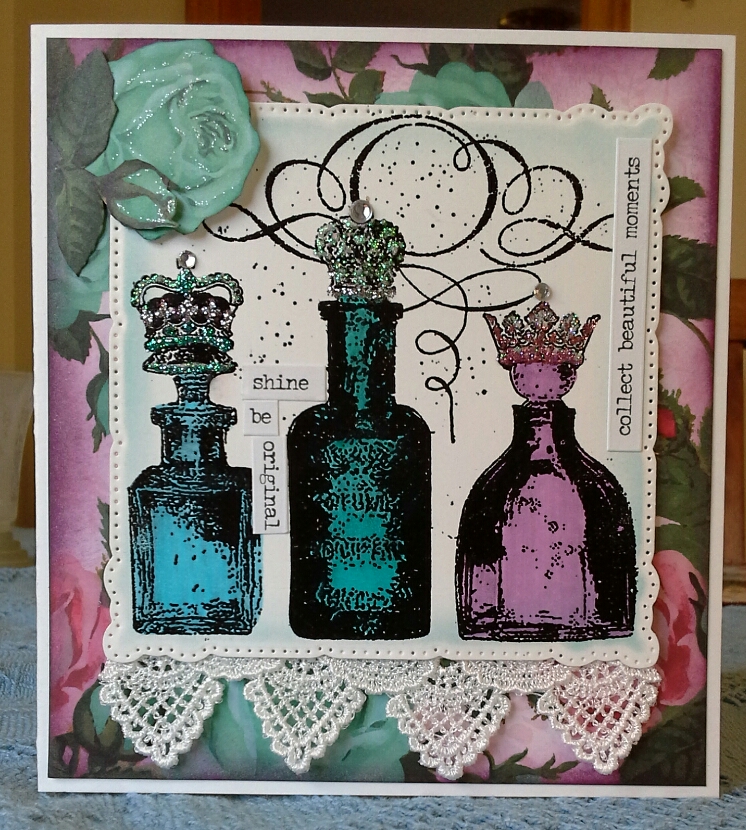
Birthday Card - Perfume Bottles
This is another card I created in October for a friend's birthday at the end of the month.
The image by Stampendous (Three Gifts #CRW064) was embossed in black EP, coloured with Copic Markers, then cut out with a Spellbinders die. I placed little chitchat words and phrases by Tim Holtz around some of the bottles for "inspiration quotes". I applied tons of Stickles glitter and a rhinestone to each of the tops of the bottles for feminine bling. Added some vintage lace to the bottom. The image is popped up with foam tape
The rose background paper is a sheet from a 12X12" paper pad "Tea Party" by Craftsmith, sponged on the edge with TH Seedless Preserves distress ink. I fussy cut out one of the roses, rosebud and some leaves, added Stickles glitter and placed it in the upper right corner.
Now I'm all up-to-date with posting. I'm working on a Christmas frame for my daughter - will post that when it is finished. Have a great day!
Sharon
Nov.16/2015
The image by Stampendous (Three Gifts #CRW064) was embossed in black EP, coloured with Copic Markers, then cut out with a Spellbinders die. I placed little chitchat words and phrases by Tim Holtz around some of the bottles for "inspiration quotes". I applied tons of Stickles glitter and a rhinestone to each of the tops of the bottles for feminine bling. Added some vintage lace to the bottom. The image is popped up with foam tape
The rose background paper is a sheet from a 12X12" paper pad "Tea Party" by Craftsmith, sponged on the edge with TH Seedless Preserves distress ink. I fussy cut out one of the roses, rosebud and some leaves, added Stickles glitter and placed it in the upper right corner.
 |
| click to enlarge |
Now I'm all up-to-date with posting. I'm working on a Christmas frame for my daughter - will post that when it is finished. Have a great day!
Sharon
Nov.16/2015
Subscribe to:
Posts (Atom)