Suzanne has announced today that she is closing down LIIU due to her ill health. I enjoyed working with her along with the other Design Team Members, and seeing all the talent there is out in blogland.
Suzanne, I'm sending huge cyber hugs and positive thoughts for your full recovery.
Take care,
Sharon
May 29, 2011


Let's Ink It Up "Team B" -Challenge #15
The next challenge for Let's Ink It Up is by our design "Team B". To be in with a chance of winning a fabulous prize, the theme for this challenge is:
" Focal sentiment and a 3D flower"
Remember that we are a rubber/clear stamping challenge so no digi stamps please
this time. We want to see the sentiment as the focal point of your project.
Here's a little info from the lovely Anne at Kreativ Hobby
Kreativ Hobby
We are a Norwegian rubberstamp producer – with more than 1000 different designs. In our webshop you will find all our rubbestamps under the category “STEMPLER”. All prices are in Norwegian Kroner. We ship worldwide and all information regarding international shipping is on our website: http://www.kreativhobby.no/
The winner can choose 4 rubberstamps from Kreativ Hobby Design. Value app. NOK 200 or $35
So hop on over to Let's Ink It Up blog and take a peek at the beautiful cards created by design Team B. Comments are always welcome!
Sharon
May 15, 2011
Let's Ink It Up Challenge #14 Embellishments
We are back from our two week vacation at Anna Maria Island, Florida. The temperatures were from 85 to 93F most days, but not humid, as there is always a nice breeze blowing off the Gulf of Mexico. Hubby and I had our long beach walk most mornings followed by a swim. Then some beach time in the afternoon with two or three swims as the sun was so hot. Our friends from Sweden and Ohio were there again this year, and we had lots of laughs with them!
Let's Ink It Up Challenge #14 is Embellishments. Remember... NO DIGIS are allowed. We want to see stamping! The sponsor is Annabelle Stamps who is donating a $20 Gift Voucher. Here is the store-
http://www.annabellestamps.blogspot.com/
Well as promised in my last post, here is my card for the challenge, although it is somewhat late...the challenge is almost over!
I did a masculine, time themed card. Had very inky fingers after this project. LOL! For the background, I did sponging with Tim Holtz distress inks (Antique Linen, Tea Dye, Forest Moss and Shabby Shutters, and randomly stamped various clock stamps & and a flourish.Also distressed and inked the edge all around.
I did Tim Holtz' Rusted Grunge technique on the round chipboard frame,embossed a clock in black on the center circle,cut out the clock hands with my Cricut. The banner triangles, mounted on a thin brown ribbon held with brads, are stamped with a woodgrain stamp, sponged with Tea Dye and Forest Moss, and the
alphabets are stamped with Pine Needles. The little embellie at the top right corner is a clock stamp covered with Crystal Glaze, cut out and mounted under a Tim Holtz metal sprocket. The advertisement is from a sheet of specialty paper which I sponged Distress inks to age it further. For the tag, I embossed the verse in black detail EP, and sponged Forest Moss around the edge. May Arts ribbon.
Sharon
May 10/2011
Let's Ink It Up Challenge #14 is Embellishments. Remember... NO DIGIS are allowed. We want to see stamping! The sponsor is Annabelle Stamps who is donating a $20 Gift Voucher. Here is the store-
http://www.annabellestamps.blogspot.com/
Well as promised in my last post, here is my card for the challenge, although it is somewhat late...the challenge is almost over!
 |
| Double Click to enlarge image |
I did Tim Holtz' Rusted Grunge technique on the round chipboard frame,embossed a clock in black on the center circle,cut out the clock hands with my Cricut. The banner triangles, mounted on a thin brown ribbon held with brads, are stamped with a woodgrain stamp, sponged with Tea Dye and Forest Moss, and the
alphabets are stamped with Pine Needles. The little embellie at the top right corner is a clock stamp covered with Crystal Glaze, cut out and mounted under a Tim Holtz metal sprocket. The advertisement is from a sheet of specialty paper which I sponged Distress inks to age it further. For the tag, I embossed the verse in black detail EP, and sponged Forest Moss around the edge. May Arts ribbon.
Sharon
May 10/2011
Let's Ink It Up Challenge #14 Embellishments
Unfortunately, I am unable to post my challenge entry pic and description as presently I have very limited internet access.....stay tuned.
Sharon
May 1, 2011
Sharon
May 1, 2011
Let's Ink It Up Challenge #13 - Stitching & DT Call
At Let's Ink It Up, Challenge #13 is now running and there is a fantastic prize up for grabs from our generous sponsor Cindy at

Here's a little message from our sponsor
"StampingScrapping is owned by Kevin and Cindy Echtinaw. We ship every in stock order within 24 hours and LOVE our customers. We pride ourselves on our customer service, speedy shipping and great prices on the newest products.
We are offering one of our CUSTOM Spellbinders matching stamp sets to the winner! Value of $19.99. You will have your choice of one of three sets. "
Now on to our new challenge, this time we want you to 'Show us your Stitching'. It could be any type of stiching on your project, real or faux as long as you use a rubber or clear stamp and remember -NO DIGI STAMPS allowed
As always, there is plenty of inspiration from our talented "Team B" Design Team which you can view by clicking HERE
Also, there is a DT call so if you'd like to join the Let's Ink It Up Design Team, just add DT after your name in the linky list for the challenge.
Sharon
April 17, 2010
Fun Crafting Tutorials and Linking Party at Passionately Artistic
Over at Passionately Artistic, they are having a linking party where you get to showcase your projects.No giveaway linking please. Click on the link to go directly to the blog to see the rules.
There's no limit to how many items you can link. Link parties are all about linking. So visit a few of the other links to discover new friends and link, link, link. This is FREE advertising for your projects!
I decided to sponsor my Easter Wall Hanging that I recently created for the Easter challenge at Let's Ink It Up. This was the first time I had made something from wood, paper, stamping and Cricut, and was very pleased with how it came out (tooting my horn... wink!)
For those of you that have already seen my project at Let's Ink It Up, this part might be boring to read. I put the wrong link in at Passionately Artistic and can't seem to delete it. So I'm copying and pasting on how I created my wall hanging. Here goes:
For my project, I have seen lots of art canvases on blogs. I figured it couldn't be too difficult...just like card making, only on a bigger scale! However, I decided to use a piece of 8"x 10" MDF board (manufactured fibreboard wood) to create my Easter wall hanging.
The background -I painted the entire surface of the wood with Tim Holtz White Distress Crackle Paint. After the paint dried and the crackle formed, I sponged randomly these colours of Tim Holtz Distress Ink- Tea Dye, Antique Linen, Fired Brick, and Tumbled Glass over the entire surface. The routered edge of the board is painted with Egyptian gold acrylic paint. I also stamped an easter script stamp in Tea Dye (Serendipity Stamps #702HCL Judy's Easter Basket - set of three stamps) on "thirds" of the board . I covered the middle section with a strip of easter egg paper, cutting and pasting some of the eggs to give the paper added dimension.
I stamped the easter basket, from the same set as mentioned above, coloured with Copics, applied Crystal Glaze and stickles on the eggs, fussy cut it out, sponged Tea Dye on the edges and mounted it on the board with pop-dots. The "grass" at the bottom of the basket is a lacey branch punch by Martha Stewart.
The bunny was cut on my Cricut from the Easter cartridge in a brown patterned paper. I sponged white craft ink and Tea Dye & Brushed Corduroy Distress Inks on the body to give it dimension, stamped a scroll stamp on the bunny's back, added the pink gingham ribbon, and created the tail using gathered crocheted lace & a pearl.
Near the basket, I cut a flourish from a Quickutz die and added the butterfly (Martha Stewart punch), highlited with stickles and pearls.The border on the bottom is also a Martha Stewart punch.
For the banner title, I punched scalloped circles from K&Co paper, sponged with Tea Dye, Tumbled Glass and a touch of Fired Brick distress inks. The letters were cut on my Cricut with the Plantin cartridge and sponged with Tea Dye DI.
All in all, this project took a few days to complete, but I'm very happy with how it turned out! I have it hanging in my front porch.
Sharon
April 6/11
There's no limit to how many items you can link. Link parties are all about linking. So visit a few of the other links to discover new friends and link, link, link. This is FREE advertising for your projects!
I decided to sponsor my Easter Wall Hanging that I recently created for the Easter challenge at Let's Ink It Up. This was the first time I had made something from wood, paper, stamping and Cricut, and was very pleased with how it came out (tooting my horn... wink!)
 |
| double click to enlarge image |
 |
| close-up of bunny |
 |
| close-up of basket |
 |
| close-up of crackle |
For those of you that have already seen my project at Let's Ink It Up, this part might be boring to read. I put the wrong link in at Passionately Artistic and can't seem to delete it. So I'm copying and pasting on how I created my wall hanging. Here goes:
For my project, I have seen lots of art canvases on blogs. I figured it couldn't be too difficult...just like card making, only on a bigger scale! However, I decided to use a piece of 8"x 10" MDF board (manufactured fibreboard wood) to create my Easter wall hanging.
The background -I painted the entire surface of the wood with Tim Holtz White Distress Crackle Paint. After the paint dried and the crackle formed, I sponged randomly these colours of Tim Holtz Distress Ink- Tea Dye, Antique Linen, Fired Brick, and Tumbled Glass over the entire surface. The routered edge of the board is painted with Egyptian gold acrylic paint. I also stamped an easter script stamp in Tea Dye (Serendipity Stamps #702HCL Judy's Easter Basket - set of three stamps) on "thirds" of the board . I covered the middle section with a strip of easter egg paper, cutting and pasting some of the eggs to give the paper added dimension.
I stamped the easter basket, from the same set as mentioned above, coloured with Copics, applied Crystal Glaze and stickles on the eggs, fussy cut it out, sponged Tea Dye on the edges and mounted it on the board with pop-dots. The "grass" at the bottom of the basket is a lacey branch punch by Martha Stewart.
The bunny was cut on my Cricut from the Easter cartridge in a brown patterned paper. I sponged white craft ink and Tea Dye & Brushed Corduroy Distress Inks on the body to give it dimension, stamped a scroll stamp on the bunny's back, added the pink gingham ribbon, and created the tail using gathered crocheted lace & a pearl.
Near the basket, I cut a flourish from a Quickutz die and added the butterfly (Martha Stewart punch), highlited with stickles and pearls.The border on the bottom is also a Martha Stewart punch.
For the banner title, I punched scalloped circles from K&Co paper, sponged with Tea Dye, Tumbled Glass and a touch of Fired Brick distress inks. The letters were cut on my Cricut with the Plantin cartridge and sponged with Tea Dye DI.
All in all, this project took a few days to complete, but I'm very happy with how it turned out! I have it hanging in my front porch.
Sharon
April 6/11
Let's Ink It Up - Challenge #12 Easter
Here it is, the first weekend of April, and the new fortnightly challenge at Let's Ink It Up is Easter. Click on the hyper link to the blog ,and check out the gorgeous projects from the Design Team.
Remember that no DIGIS are allowed - we like to see inky fingers! LOL The sponsor for this challenge is:
 SCRAPPIT is a company based in Australia that provides all scrapbooking and card making supplies from all the top brands at the best prices.Paula has generously donated a prize package of
For my project, I have seen lots of art canvases on blogs. I figured it couldn't be too difficult...just like card making, only on a bigger scale! However, I decided to use a piece of 8"x 10" MDF board (manufactured fibreboard wood) to create my Easter wall hanging.
The background -I painted the entire surface of the wood with Tim Holtz White Distress Crackle Paint. After the paint dried and the crackle formed, I sponged randomly these colours of Tim Holtz Distress Ink- Tea Dye, Antique Linen, Fired Brick, and Tumbled Glass over the entire surface. The routered edge of the board is painted with Egyptian gold acrylic paint. I also stamped an easter script stamp in Tea Dye (Serendipity Stamps #702HCL Judy's Easter Basket - set of three stamps) on "thirds" of the board . I covered the middle section with a strip of easter egg paper, cutting and pasting some of the eggs to give the paper added dimension.
I stamped the easter basket, from the same set as mentioned above, coloured with Copics, applied Crystal Glaze and stickles on the eggs, fussy cut it out, sponged Tea Dye on the edges and mounted it on the board with pop-dots. The "grass" at the bottom of the basket is a lacey branch punch by Martha Stewart.
The bunny was cut on my Cricut from the Easter cartridge in a brown patterned paper. I sponged white craft ink and Tea Dye & Brushed Corduroy Distress Inks on the body to give it dimension, stamped a scroll stamp on the bunny's back, added the pink gingham ribbon, and created the tail using gathered crocheted lace & a pearl.
Near the basket, I cut a flourish from a Quickutz die and added the butterfly (Martha Stewart punch), highlited with stickles and pearls.The border on the bottom is also a Martha Stewart punch.
For the banner title, I punched scalloped circles from K&Co paper, sponged with Tea Dye, Tumbled Glass and a touch of Fired Brick distress inks. The letters were cut on my Cricut with the Plantin cartridge and sponged with Tea Dye DI.
All in all, this project took a few days to complete, but I'm very happy with how it turned out! I have it hanging in my front porch.


Sharon
April 3, 2011
Challenges
Die Cutting Divas #8 Hippity, Hoppity - Easter cartridge for Bunny, Plantin Cartridge for letters on banner
Fantabulous Cricut #53 - Looks Like Spring - Easter Cartridge for Bunny, Plantin Cartridge for letters on banner.
Paper Variety 1-2-3 Challenge- 1 stamped image (basket), 2 ribbons (pink gingham & crocheted lace gathered into bunny tail), 3 punches (Martha Stewart butterfly, scroll border, and lacey leaf which is the "grass" at the bottom of the basket.
Really Reasonable Ribbons #21 Punches & Ribbons - 3 Martha Stewart punches -butterfly, scroll border, and lacey leaf which is the "grass" at the bottom of the basket. 2 Ribbons - pink gingham, and crocheted lace with is gathered into bunny tail.
Remember that no DIGIS are allowed - we like to see inky fingers! LOL The sponsor for this challenge is:
A$20 VOUCHER
The background -I painted the entire surface of the wood with Tim Holtz White Distress Crackle Paint. After the paint dried and the crackle formed, I sponged randomly these colours of Tim Holtz Distress Ink- Tea Dye, Antique Linen, Fired Brick, and Tumbled Glass over the entire surface. The routered edge of the board is painted with Egyptian gold acrylic paint. I also stamped an easter script stamp in Tea Dye (Serendipity Stamps #702HCL Judy's Easter Basket - set of three stamps) on "thirds" of the board . I covered the middle section with a strip of easter egg paper, cutting and pasting some of the eggs to give the paper added dimension.
I stamped the easter basket, from the same set as mentioned above, coloured with Copics, applied Crystal Glaze and stickles on the eggs, fussy cut it out, sponged Tea Dye on the edges and mounted it on the board with pop-dots. The "grass" at the bottom of the basket is a lacey branch punch by Martha Stewart.
The bunny was cut on my Cricut from the Easter cartridge in a brown patterned paper. I sponged white craft ink and Tea Dye & Brushed Corduroy Distress Inks on the body to give it dimension, stamped a scroll stamp on the bunny's back, added the pink gingham ribbon, and created the tail using gathered crocheted lace & a pearl.
Near the basket, I cut a flourish from a Quickutz die and added the butterfly (Martha Stewart punch), highlited with stickles and pearls.The border on the bottom is also a Martha Stewart punch.
For the banner title, I punched scalloped circles from K&Co paper, sponged with Tea Dye, Tumbled Glass and a touch of Fired Brick distress inks. The letters were cut on my Cricut with the Plantin cartridge and sponged with Tea Dye DI.
All in all, this project took a few days to complete, but I'm very happy with how it turned out! I have it hanging in my front porch.
 |
| Double click to view Easter Wall Hanging |


 |
| Close up of "crackle" on the wood |
Sharon
April 3, 2011
Challenges
Die Cutting Divas #8 Hippity, Hoppity - Easter cartridge for Bunny, Plantin Cartridge for letters on banner
Fantabulous Cricut #53 - Looks Like Spring - Easter Cartridge for Bunny, Plantin Cartridge for letters on banner.
Paper Variety 1-2-3 Challenge- 1 stamped image (basket), 2 ribbons (pink gingham & crocheted lace gathered into bunny tail), 3 punches (Martha Stewart butterfly, scroll border, and lacey leaf which is the "grass" at the bottom of the basket.
Really Reasonable Ribbons #21 Punches & Ribbons - 3 Martha Stewart punches -butterfly, scroll border, and lacey leaf which is the "grass" at the bottom of the basket. 2 Ribbons - pink gingham, and crocheted lace with is gathered into bunny tail.
Quick card for Brother
My brother's birthday snuck up on me and I made a quick card to get in the mail, so it would reach him on time.
 I used my Cricut Expression to cut a pick-up truck from the "Just Because Cartridge" and tire tread from "Dude" cartridge. The truck is red Bazzill edged with Tim Holtz Aged Mahogany distress ink popped up with foam dots; fenders, door handle and bumper are silver mirror cardstock; Using my craft knife, I cut out the window and put in a piece of acrylic to look like glass. I used a woodgrain stamp to stamp the boards & sponged the edges with TH Tea Dye, then stamped "Happy" and "Birthday" on little tags placed in the bed of the truck.
The circle verse "Picking up Some Wishes for You!" (the pick-up is hauling wishes) I created using MS Word with Word Art program, punched out with a Marvy punch . Tea Dye was also sponged around the edge. The design echoes that of the tires.
Papers are by 7 Gypsies- Zanzibar 8x8" pad. Faux stitching around the edge.
Challenge
Cooking with Cricut -Funny Quote, Saying or Pun
Sharon
March 30/2011
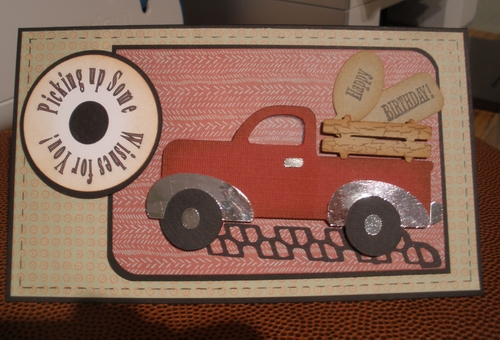
The circle verse "Picking up Some Wishes for You!" (the pick-up is hauling wishes) I created using MS Word with Word Art program, punched out with a Marvy punch . Tea Dye was also sponged around the edge. The design echoes that of the tires.
Papers are by 7 Gypsies- Zanzibar 8x8" pad. Faux stitching around the edge.
Challenge
Cooking with Cricut -Funny Quote, Saying or Pun
Sharon
March 30/2011
Featured Stamper Announcement- Let's Ink It Up

Please click here to read the official announcement of the new "Featured Stamper" and see how you and your work can be showcased on Let's Ink It Up blog.
A new person will be chosen every two weeks!
Sharon
March 23/11
Let's Ink It Up Challenge #10 Embossing
Reminder
There is just a little over a week to enter the Let's Ink It Up Challenge #10 Embossing.
Come and join in...we would love to see some new faces, and there is a great prize up for grabs too!
Sharon
March 11,2011
There is just a little over a week to enter the Let's Ink It Up Challenge #10 Embossing.
Come and join in...we would love to see some new faces, and there is a great prize up for grabs too!
Sharon
March 11,2011
Subscribe to:
Posts (Atom)