Cricut Reindeer card - Christmas Noel Cartridge

I had yet another night of waking up at 2:30am last night!  After tossing and turning I decided to get up, made myself a piece of cinnamon toast and decided to play with my Cricut.

With Design Studio, I cut the reindeer (keypad row 1, image #3 across) from brown patterned paper at 4"tall  x 2-1/2" wide, and the background using the shadow feature. I used Tim Holtz Distress ink "Tea Dye" to shade all around the edge of the reindeer's body. Embellishments are a bit of gingham ribbon tied on his neck, a brown pearl for his eye, and red jewel for his nose. The holly in the corner is a die by Sizzix.

The "Christmas" verse at the bottom is from the same cartridge (keypad Row 2, image #10 across).  Inside is stamped "have yourself a merry little christmas" by Penny Black.

The oval layer is Spellbinders Labels Ten stamped with Stamper's Anonymous Tim Holtz music script stamp in Tea Dye ink and shaded with Crushed Olive.

Background script reindeer paper is from Basic Grey "Jovial" 6x6 paper pad.  Other cardstock is Stampin'Up, and Bazzill scraps.


Sharon
Dec. 01/10

Challenges:


Die Cuts R Us #66 - Anything Goes

Pile it on - Fur or Feathers

Crazy for Challenges #C4C65 - Script Paper

Speedy the Cat #31 - Bow

The Paper Variety, Wed. Dec. 1st -Tic, Tac, Toe

Top, Tip Tuesday #12 - Anything Goes

Fargo Cat Designs-Card Class Nov. 25/10

Well, I'm finally getting around to posting the pic of the card class that I attended last Saturday sponsored by Deborah Lecreux of Fargocat Shops. She is showing the cards

Marilyn M. was teaching the class, a small group, but we had fun doing the four christmas cards using a variety of techniques - for example, distressing using Tim Holtz Distress inks and his blending foam tool, and learning how to use Martha Stewart border and corner punches to create a lacy edge all around a rectangle layer.

Marilyn, Wendy and I had lunch afterwards at our favourite spot, Cafe Italia, a perfect ending to a great class.

Sharon
Nov.1/10

Did you see? Tim Holtz Christmas Tags Day 1

Well Tim has posted his first tag for this christmas season on his blog and it's a beauty! It's neat how he transforms his die of the spooky haunted house  into a respectable wood shingled house covered with snow. He certainly has the knack of creating lots of different looks from his products.

I don't know if I would go to all the trouble of re-creating this particular tag - there seems to be a lot more steps than usual, but it's eye candy for sure!

Click on the title of this post to go directly to Tim's blog to view the tag.

Sharon
Dec. 1/10

Christmas Card - No Stamping

Last year after the holidays, I bought some "Heartwarming Vintage Creative Scraps" cardstock images by Crafty Secrets  and decided to use a few this year for christmas cards. I love this one of the winter birds! Click on the blue link to go to their website where you can view all their beautiful cardstock images, stickers, fabric scraps, Clear Art stamps, etc.


In the pic, the red half circles look different shades of red, but they are the same cardstock. It's just the way the sun was shining in the window on the card.

This morning on my blog dashboard, I was reading a post by Linda of Studio L3 where she entered a card into a "no stamp challenge" on Drunken Stampers challenge blog. What a funny name for a blog  - it made me chuckle out loud!  Well, I think I will enter my card too. 

Sharon
Nov.22/10

Drunken Stampers Challenge #43 - No Stamping

Lollipop Crafts Challenge Nov. 22nd- Christmas

Really Reasonable Ribbon Ramblings -Challenge #12 Christmas plus ribbon & lace

Obsessed with Scrapbooking Contest

Joy, at Obsessed with Scrapbooking announced today 7 new Cricut Lite carts. She is having a contest with a giveaway of the new Winter Frolic cartridge, Glue Rider gun, and SEI paper pad. Click on the title of this post to go direct to her blog.

Sharon
Nov.19/10

Studio L3 - Compendium of Curiosities Challenge #21

My friend Marilyn regularly participates in Studio L3 challenges and she does the most amazing work using the instructions in Tim Holtz Compendium of Curiosities. I've had my book for a while now and decided I should try out some of the techniques.

The challenge this week is "Perfectly Distressing"!  You'll find the instructions on page 38 of the book. I used it on the truck image which is my favourite TH stamp for masculine cards. Although it's hard to see the pearl shine in the pic, a bit of it shows on the back end of the truck.

For the card, I used:
-Bazill cardstock, Basic Grey graph paper, Karen Foster Collage paper
-Tim Holtz Alterations Embossing Folder "Patchwork"
-TH Distress Inks - Tea Dye, Brushed Corduroy, & Forest Moss
-Perfect Pearls Gold
-Truck stamp & verse from the TH "Journey" Visual Artistry collection
-Oval and Scallop Spellbinders Nesties
-Metal corner & lock are embellies from my stash.


Double Click to enlarge pic

Sharon
Nov.10/10

Challenges:

Studio L3 - Compendium of Curiosities Challenge #21 - Perfect Distressing

Kaboodle Doodles Challenge #43 - Make it Vintage

Simon Says Challenge Nov. 10 - Favourite Tim Holtz Stamp

Woo Hoo! Card Published in Penny Black Gallery

I had an email this morning from Pat at pbstamps.com that they are publishing another of my Penny Black cards in their gallery. It is a christmas one using the stamp "Xmas from Head to Toe, #3744K". Click here to see it at the bottom of the gallery page on the left, or if you want to look at other cards in the gallery.  As well, I'm attaching the pic to this post.

The card is quite basic as far as the layout, however, Pat said that she loved how I decorated the girl with bling on her earrings, bracelet,  hanging star, and dog collar; Also the "fur" (white flocking) on her dress, hat, boots, purse and dog hat.

Sharon
Nov.2/10

Snowflake Angel


 I think my muse is back......finally!  It must be the pressure of knowing that the weeks will fly by until Christmas, and those holiday cards must be made. I decided to try out my new SU Sizzix snowflake embossing folder.

Seeing the pic of my card now on the blog, it looks warped. Really it is normal. I just have to remind myself not to get so close up with the zoom from time to time. I would have taken another one, but by the time I was done yesterday afternoon, it had gotten dark out.

-Papers Stampin'Up Shimmery White, and Silver Mirror
-Stampin'Up Sizzix "Northern Flurry" Embossing Folder
-Angel Stamp from set -Inkadinkadoo "Christmas Silhouette" clear stamps, embossed in silver detail EP
-Cuttlebug Snowflake die
-Spellbinders Ribbon Tag; Peace verse stamp from Inkadinkadoo "Holiday Wishes" embossed in silver detail  EP
-Rhinestones & Ribbon

I also used my ScorPal board to emboss a line 1/8" in from the edge all around the main layer.

Sharon
Nov 02/10

Challenges 


Kitchen Sink #29 - Monochromatic

Stamper With Fun #83 - All that can Fly

Tip Top Tuesday #8 - Christmas

Gingersnap Creations Challenge -  Holiday  Happenings, Things with Wings

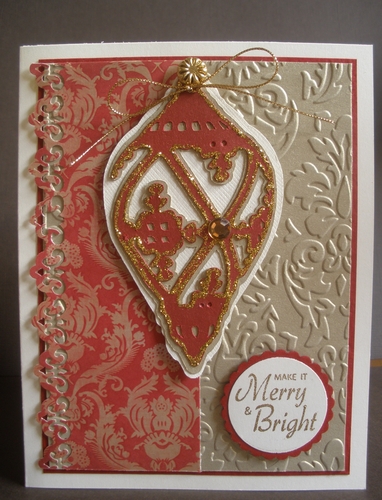
Another Ornament Card - Cricut "Christmas Noel" Cartridge

This is another ornament I made last night from the Cricut "Christmas Noel" cartridge using Metallic Red for the detailed main ornament, SU Gold for second background layer, and SU Cream for third shadow layer, Gold Stickles, fancy gold brad, SU Gold cord, and Gold Rhinestone.

Also used on the card is the Cuttlebug Damask Folder on the SU Gold layer, EK Success border punch.
Red Damask Paper is from Kaisercraft  6"x6" pad "Tis the Season"

SU circle punch, and Scalloped circle punch.
Verse is by Just Rite Stamps.

Sharon
Oct. 30/10

Challenges:

All Sorts Weekly Challenge #76 - Gold and Cream with Red

Bee Crafty Christmas Challenge #41  Christmas

Speedy Cat Challenge - Holiday

Moxie FabWorld - Diggin on Damask

Papertake Weekly - Anything Sparkly and Bright

ABC Challenge - Glitter

Ornament -Cricut "Christmas Noel" Cartridge


I played with the Cricut "Christmas Noel" cartridge the other day and made a few ornaments (keypad item -row 3 down, and #3 across). I cut them on Design Studio at 4" long and 2-1/4" wide using the main image, layer and shadow functions in different metallic and Bazzill papers. Then I spread Stickles all around the edge.  I also used the multi-cut function set at #2 to cut the images as they are so detailed (the first one I couldn't lift from the mat).

Here is a card I finished tonight using one of the ornaments.

-The white background layer is embossed with the Cuttlebug Damask Folder
-The printed border layer was cut with the SU Sizzix Topnote die
-Silver edging is Flower Soft Peel-off Stickers #457 Silver
-SU Ribbon

Sharon
Oct.29/10

Challenge: 

Moxie Fab World Oct. 28 - Diggin on Damask

Papertake Weekly - Oct. 26 Anything Sparkly and Bright

ABC Challenge - G is for Glitter

Paper Garden - Christmas/Holidays