My husband asked me to make a Thank you card for a lady who helped him with the Open House of the local curling club (he is President this year). So, I also incorporated a few challenges in this card.
-On the swirl paper I used blue chalk ink and sponged over the pattern. Also Tim Holtz Tea Dye Distress ink on the edges. On the brown paper, I used a script stamp, Martha Stewart clear butterfly, and also TH Tea Dye Distress ink on the edges.
-Cream organza ribbon overlaid with brown stitched ribbon binds the two patterned papers.
- The oval was cut with Nesties and sponged around the edge with TH Tea Dye, popped up with foam tape. The thank you verse and oval is by Inkadinkadoo "Expressions & Frames" clear set. I then added Copper Stickles, and brown & cream pearls to highlite.
-Copper Stickles and pearls also highlite the butterflies
-EK Success embossed border punch on the bottom echoes the stamped pattern on the oval.
Sharon
Oct.17/10
Challenges:
Allsorts Challenge #74 - Bingo Line Right Down - Pearls/Mist, Stickles/Ribbon
Little Red Wagon #50 - Use Something New, Something Old. Something new for me is the clear stamp set by Inkadinkadoo - "Expressions & Frames". Something old is the ribbon and copper stickles.
Cute Card Thursday #134 - What's Bugging You? - insect stamps.
Another HM "Carrot Mouse" card
| Double click to enlarge pic |
A few weeks ago, I coloured six of these House Mouse images to have on hand. I put together this one on Monday but didn't upload right away as I wanted it to be a surprise to the person who received it. That's the bad thing about blogs - it's like a sneak peek for friends to see what you've been up to. LOL!
I haven't been feeling well lately and my cardmaking certainly shows it. You wouldn't believe how many have ended up in the "round filing bin" the last two weeks.....layers not straight, ink smudged, things just not working out!!! Probably you've noticed the layers aren't straight on this one either, but I didn't want to re-do for a third time. C'est la vie!
-Paper is from the Basic Grey "Eerie" 6x6 pad.
-layers and tag are Spellbinders
-The trick or treat stamp is by Studio G mini pack
-Cuttlebug Swiss Dots folder
-Tim Holtz distressing ink- Marmalade & Black Soot
-EK Success curved embossing punch
Sharon
Oct.7/10
Challenge
Paper Playtime # 19 -"Buttons & Ribbons"
Pollycraft Monday Challenge #64 - "Anything Goes"
Woo Hoo! I've been Published in SNR!
Woo Hoo! I just found out by email this morning that my House Mouse Pumpkin card will be published in the October 31st edition of Scrapbook News and Review, an on-line scrapbooking magazine. However, SNR also has sections for stamping and cardmaking, sketches, altered art, galleries, and community Forum.
I get regular email newsletters from SNR Card Universe Blog and lately they have been doing the daily Fall Tags. A week and a half ago, when I was checking out the first tag, I noticed a call for submissions for October. I have never done this before, so on a whim I decided to send them my pumpkin card. I figured I would never hear anything back because they would get so many entries......Boy, was I surprised when I got the email this morning!!!!
Now, I'm off to go and try to find all the places where my card might be seen and remove it as required by being published..........
Sharon
Oct. 6/2010
I get regular email newsletters from SNR Card Universe Blog and lately they have been doing the daily Fall Tags. A week and a half ago, when I was checking out the first tag, I noticed a call for submissions for October. I have never done this before, so on a whim I decided to send them my pumpkin card. I figured I would never hear anything back because they would get so many entries......Boy, was I surprised when I got the email this morning!!!!
Now, I'm off to go and try to find all the places where my card might be seen and remove it as required by being published..........
Sharon
Oct. 6/2010
Cricut Pumpkin and House Mouse "Mouse Carrot"
It's been a while since I've made a card so tonight I decided to play with a new House Mouse stamp "Mouse Carrot". The pumpkin card shape and layers were cut using my Cricut from Bazzill Bling and Basic Grey patterned papers. The image is coloured with Copic markers, and I used Tim Holtz Marmalade Distress Ink around the edge. It is cut with a circle Nestie, and layered on a scalloped circle Nestie popped up with foam dots. A bit of orange floss, rafia ribbon, and halloween ribbon tag completes the card.
Sharon
Sept.19/10
Challenges:
Paper Sundaes Challenge #36 - Fall Card
Delightful Challenges Pumpkins Everywhere
Paper Play Challenges Week #37 - All Shapes and Sizes
Spoonful of Sugar Challenge #121 -Fall Into Autumn Colours
Creative Card Crew Week Sept.14 - Autumn/Fall
Sharon
Sept.19/10
Challenges:
Paper Sundaes Challenge #36 - Fall Card
Delightful Challenges Pumpkins Everywhere
Paper Play Challenges Week #37 - All Shapes and Sizes
Spoonful of Sugar Challenge #121 -Fall Into Autumn Colours
Creative Card Crew Week Sept.14 - Autumn/Fall
Flower Soft card class at Fargo Cat Designs
This afternoon I went to a Flower Soft card class taught by Deborah at her shop Fargo Cat Designs. My friend Marilyn and her SIL Sandra also attended.
We each made a very cute 3D pop-up christmas card. There are two designs in the kit featuring a girl and dog looking through the store window, and a boy holding a small child. The "snow" on the window is Flower Soft Polar White. The edging around the border of the card is Ultra Fine Silver Peel Offs. I thought this was much easier than the old way of using Krylon edging pens!

Here's is a close-up of the 3-D effect and the snow:

It was a fun afternoon! Now I can't wait to tackle other Flower Soft projects.
Sharon
Sept.10/10
We each made a very cute 3D pop-up christmas card. There are two designs in the kit featuring a girl and dog looking through the store window, and a boy holding a small child. The "snow" on the window is Flower Soft Polar White. The edging around the border of the card is Ultra Fine Silver Peel Offs. I thought this was much easier than the old way of using Krylon edging pens!
Here's is a close-up of the 3-D effect and the snow:
It was a fun afternoon! Now I can't wait to tackle other Flower Soft projects.
Sharon
Sept.10/10
Back to stamping and Penny Black challenge #117
We are now home from the cottage after a wonderful summer, particularly last week with temps in the 30C to 33C range (high 90's for those of you who use fahrenheit). It was unseasonal weather for early September in Nova Scotia, but nice to have those final beach days for swimming. The ocean is very warm. Hurricane Earl blew through on Saturday resulting in five trees that crashed,luckily none near the cottage, although two did block the road in the lane. DH spent the day yesterday manning the chain saw in order to clear the road. The power was out from 2:00pm until 11:30 pm. Crazy me...I sort of like storms! Both DH and I curled up with books (we are reading the Steig Larsson series Girl with a Dragon Tattoo, Girl who Played with Fire and I'm on the last one-Girl who Stirred the Hornets Nest) while watching the huge waves on the beach, the rain slashing down and wind stirring the trees. After dark, we lit the kerosene lamps and candles. Supper was courtesy the barbeque!
Today I spent the morning unpacking, putting away groceries, and washing bedding, towels, etc. Already our dog Penny is bored being back at home in town and having to be tied up - no more swims and romps on the beach, Sigh! LOL.
OK, you're saying, enough with the rambling....on with the challenges!
The main Challenge is for Penny Black Saturday Challenge Week #117 using colours Brown, Cream and Purple, following the sketch by Mojo Monday #155which I turned sideways. The image is from the acrylic PB Allegro series of flowers, product #30-033. I coloured the hydrangea with SU markers, then "huffed" on the image before stamping creating a watercoloured effect. The verse is not PB. I also used Oval Nesties, Cuttlebug "Damask Frame" embossing folder on the right edge,a decorative corner punch, cream lace, ribbon, and pearls to complete the card. Patterned Papers are scraps, and layer is Bazzill burgundy, although it looks brown in the pic

Double click to enlarge pic
Sharon
Sept.8/10
Penny Black SaturdayWeek #117 - Colours Brown, Cream & Purple
Mojo Monday #155 - Sketch (turned sideways)
Shabby Tea Room Week #26 "Tag You're It"
Pile It On #35 Layers
Today I spent the morning unpacking, putting away groceries, and washing bedding, towels, etc. Already our dog Penny is bored being back at home in town and having to be tied up - no more swims and romps on the beach, Sigh! LOL.
OK, you're saying, enough with the rambling....on with the challenges!
The main Challenge is for Penny Black Saturday Challenge Week #117 using colours Brown, Cream and Purple, following the sketch by Mojo Monday #155which I turned sideways. The image is from the acrylic PB Allegro series of flowers, product #30-033. I coloured the hydrangea with SU markers, then "huffed" on the image before stamping creating a watercoloured effect. The verse is not PB. I also used Oval Nesties, Cuttlebug "Damask Frame" embossing folder on the right edge,a decorative corner punch, cream lace, ribbon, and pearls to complete the card. Patterned Papers are scraps, and layer is Bazzill burgundy, although it looks brown in the pic
Double click to enlarge pic
Sharon
Sept.8/10
Penny Black SaturdayWeek #117 - Colours Brown, Cream & Purple
Mojo Monday #155 - Sketch (turned sideways)
Shabby Tea Room Week #26 "Tag You're It"
Pile It On #35 Layers
Joy Fold Card - Revisiting old SU set "Garden Collage"
I was going through my older stamps the other day and came across this SU set from 2005 called Garden Collage. I always liked the images and decided to use the bird one on a card for a friend who recently had surgery. Inside, the verse from the same set reads "Gently thinking of you".
While I had planned to do a "joy fold", I wondered where to go from there. The challenge this week on Crafty Creations is a recipe for 3 patterned papers, 2 ribbons, and 1 charm. So I incorporated the recipe into the joy fold card. I used tone-on-tone turquoise printed paper as an alternate colour because there is a bit of the same shade in the floral paper on the right side. Although the pattern is faint to see in my pic, it is sorted of an allover stitched type. I also used three embossing folders -Cuttlebug "Swiss Dots", Crafts Too "Daisies" and "Flower Swirls" (I think that is the name - the folder case is missing! Ooops!)
As it turned out, there is another blog challenge for the "recipe 3,2,1", so I'm entering my card in that as well.
-The image is coloured with Derwent water colour pencils
-The three patterned papers were scraps I had on hand
-The two ribbons are by SU - one is wrapped around a layer; the other I gathered into a ribbon flower centered with a prima and pearl
-The charm is a silver heart (or one item)

(double click to enlarge pic)
Sharon
Aug.27/10
Challenges
Crafty Creations #82 - Recipe - 3 papers, 2 ribbons or trim, 1 charm
Paper Take Weekly -Recipe Time, three of one thing, two of another, and one item.
While I had planned to do a "joy fold", I wondered where to go from there. The challenge this week on Crafty Creations is a recipe for 3 patterned papers, 2 ribbons, and 1 charm. So I incorporated the recipe into the joy fold card. I used tone-on-tone turquoise printed paper as an alternate colour because there is a bit of the same shade in the floral paper on the right side. Although the pattern is faint to see in my pic, it is sorted of an allover stitched type. I also used three embossing folders -Cuttlebug "Swiss Dots", Crafts Too "Daisies" and "Flower Swirls" (I think that is the name - the folder case is missing! Ooops!)
As it turned out, there is another blog challenge for the "recipe 3,2,1", so I'm entering my card in that as well.
-The image is coloured with Derwent water colour pencils
-The three patterned papers were scraps I had on hand
-The two ribbons are by SU - one is wrapped around a layer; the other I gathered into a ribbon flower centered with a prima and pearl
-The charm is a silver heart (or one item)
(double click to enlarge pic)
Sharon
Aug.27/10
Challenges
Crafty Creations #82 - Recipe - 3 papers, 2 ribbons or trim, 1 charm
Paper Take Weekly -Recipe Time, three of one thing, two of another, and one item.
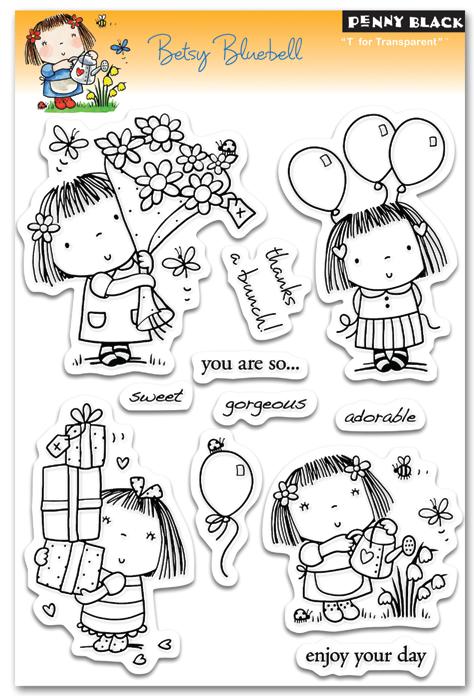
Penny Black Betsy Bluebell
Peter went to the cottage today, but it is rather coolish and fall feeling in the air. I decided to stay home and stamp, and really enjoyed getting back into the blog challenges.
I recently purchased the new Penny Black clear set "Betsy Bluebell", product #30-053. It has four cute images and six verses, so I followed the sketch for the PB Saturday challenge this week.
-The image is coloured with Copics, and cut out with the Petite Classic Oval Nesties, second largest in the set, popped up with foam tape.
-I created a flower oval layer using my Cricut Expression and Design Studio - "Lacy Labels" cartridge. It is the "Beautiful" base icon, third row down, #5 across on the keypad, set at 4" wide by 5" long.
-Paper is double-sided Imaginesce, so I used the dotted side for the two contrasting bars at the bottom.
-Lacy Border is a Martha Stewart punch. Primas with pearl centres and two buttons completes the sketch. Stickles glitter on the butterfly wings.

Sharon
Aug. 22/2010
Other Challenges
Let's Ink it up Challenge - Colour Yellow
Fun with Shapes and More Challenge #64
I recently purchased the new Penny Black clear set "Betsy Bluebell", product #30-053. It has four cute images and six verses, so I followed the sketch for the PB Saturday challenge this week.
-The image is coloured with Copics, and cut out with the Petite Classic Oval Nesties, second largest in the set, popped up with foam tape.
-I created a flower oval layer using my Cricut Expression and Design Studio - "Lacy Labels" cartridge. It is the "Beautiful" base icon, third row down, #5 across on the keypad, set at 4" wide by 5" long.
-Paper is double-sided Imaginesce, so I used the dotted side for the two contrasting bars at the bottom.
-Lacy Border is a Martha Stewart punch. Primas with pearl centres and two buttons completes the sketch. Stickles glitter on the butterfly wings.
Sharon
Aug. 22/2010
Other Challenges
Let's Ink it up Challenge - Colour Yellow
Fun with Shapes and More Challenge #64
So Happy! Card published in Gallery
I received an email tonight that one of my cards has been published on-line in the Penny Black gallery at PBStamps.com. My card is third row down, on the right.
I created this card back in April for two challenges - one being a sketch, and the other to use Gable Green, Green Galore, and Dusty Durango which was really hard because I would tend to think of these colours as sort of Christmasy, not spring or summer.
Woo, hoo ....I'm so happy!
Sharon
August. 18/10
I created this card back in April for two challenges - one being a sketch, and the other to use Gable Green, Green Galore, and Dusty Durango which was really hard because I would tend to think of these colours as sort of Christmasy, not spring or summer.
Woo, hoo ....I'm so happy!
Sharon
August. 18/10
"Haunting" - October 31st Cartridge
I know it's early for Hallowe'en, but I just recently purchased the October 31st cart, and wanted to play with it. There are lots of cool halloween images on this cart - check here:
October 31st cartridge
First of all I cut a small circle with my Nestie dies and placed it on white cardstock (4" x 5-1/4") in the upper left corner as a template for the moon. Holding down the circle with your left hand and being careful not to move it around, sponge the whole area of the white cardstock with Brilliance black ink,including over the circle; however leave a bit uninked at the bottom for the grass. Removing the circle leaves an uninked area to then sponge in Brilliance Yellow and Orange creating the moon. Using a Q-tip, I dabbed it in Brilliance Moonlight White ink and created whispy clouds scudding past the moon. I also sponged Brilliance Green on the bottom to create grass.
I cut a headstone, cat and wrought iron fence from the October 31st cart. I sponged silver ink on the fence to give it a metallic look, and black around the edges of the headstone to add dimension. The headstone is propped up with pop-dots.
The tab at the top is a SU punch on which I stamped "a haunting we will go" (Studio G stamp). I also punched two tiny holes and threaded black gingham ribbon to make a faux bow. The bat is from a cuttlebug die.
I added faux stitching around the edge and used a Tim Holtz distressor thingy to sand the edges giving a worn look.
Yellow layer is Bazzill, and the black layer is "Origins" graph design by Basic Grey.

Sharon
Aug. 18/10
Entries:
Halloween card: http://darknessinspiration.blogspot.com/
Stampin' B's Challenge #71 - Make a Scene card
October 31st cartridge
First of all I cut a small circle with my Nestie dies and placed it on white cardstock (4" x 5-1/4") in the upper left corner as a template for the moon. Holding down the circle with your left hand and being careful not to move it around, sponge the whole area of the white cardstock with Brilliance black ink,including over the circle; however leave a bit uninked at the bottom for the grass. Removing the circle leaves an uninked area to then sponge in Brilliance Yellow and Orange creating the moon. Using a Q-tip, I dabbed it in Brilliance Moonlight White ink and created whispy clouds scudding past the moon. I also sponged Brilliance Green on the bottom to create grass.
I cut a headstone, cat and wrought iron fence from the October 31st cart. I sponged silver ink on the fence to give it a metallic look, and black around the edges of the headstone to add dimension. The headstone is propped up with pop-dots.
The tab at the top is a SU punch on which I stamped "a haunting we will go" (Studio G stamp). I also punched two tiny holes and threaded black gingham ribbon to make a faux bow. The bat is from a cuttlebug die.
I added faux stitching around the edge and used a Tim Holtz distressor thingy to sand the edges giving a worn look.
Yellow layer is Bazzill, and the black layer is "Origins" graph design by Basic Grey.
Sharon
Aug. 18/10
Entries:
Halloween card: http://darknessinspiration.blogspot.com/
Stampin' B's Challenge #71 - Make a Scene card
Subscribe to:
Posts (Atom)